Crispy Chicken Caesar Sandwich-Best Easy Recipe
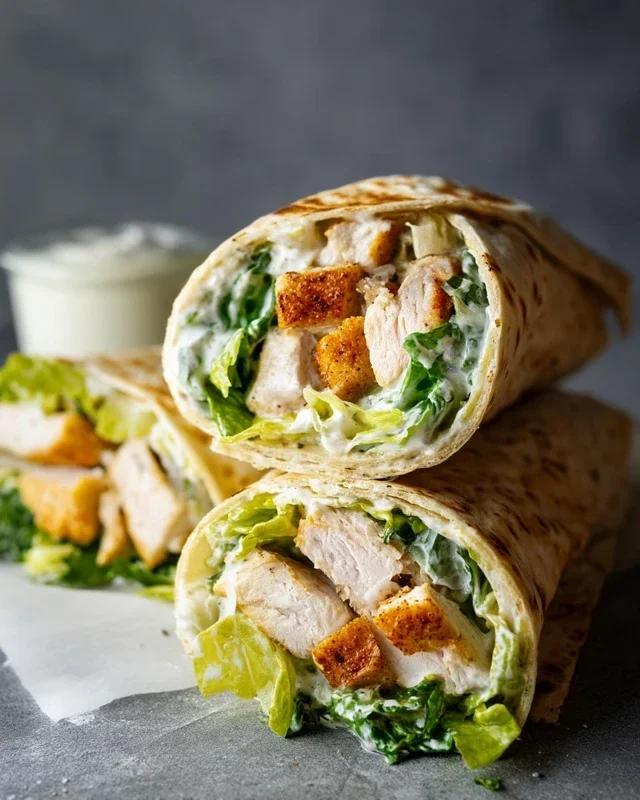
The ultimate Crispy Chicken Caesar Sandwich is here to elevate your lunch game! We’ve all been there, craving that perfect balance of textures and flavors. That’s exactly what makes this sandwich so incredibly popular. It’s not just a sandwich; it’s an experience. The satisfying crunch of perfectly fried chicken, the creamy, tangy Caesar dressing that clings to every bite, the crisp romaine lettuce offering a refreshing counterpoint, and the warm, soft embrace of a toasted bun – it all comes together in a symphony of deliciousness. What truly makes this Crispy Chicken Caesar Sandwich special is how it takes a beloved classic and transforms it into a portable, handheld masterpiece. It’s comforting, it’s indulgent, and it’s ridiculously easy to make, proving that gourmet can be simple. Get ready to discover your new go-to meal!

Crispy Chicken Caesar Sandwich
There’s something undeniably satisfying about a truly great sandwich. The perfect balance of textures and flavors can elevate a simple meal into something truly special. Today, we’re taking the classic Caesar salad and transforming it into a handheld masterpiece: the Crispy Chicken Caesar Sandwich. This isn’t just any chicken sandwich; we’re talking about golden, perfectly seasoned chicken, a creamy, tangy Caesar dressing that will make your taste buds sing, and all nestled between your favorite bread. Get ready to impress yourself (and anyone lucky enough to share!) with this incredibly delicious creation.
Ingredients:
Note 1: Chicken Cutlets
For the best results, use chicken cutlets, which are thinly sliced chicken breasts. If you can’t find them pre-cut, you can easily make your own. Simply take boneless, skinless chicken breasts and slice them horizontally to create thinner pieces. You can also pound them gently between two pieces of plastic wrap to achieve an even thickness, which helps them cook quickly and uniformly.
Making the Caesar Dressing
The heart of any Caesar sandwich is its dressing. We’re going to make a homemade Caesar dressing that is rich, creamy, and bursting with authentic flavor. Forget the bottled stuff; this is a game-changer.
Preparing the Crispy Chicken
The star of our sandwich is, of course, the chicken. We want it to be incredibly crispy on the outside and juicy on the inside. This simple breading and frying method will achieve just that.
Assembling Your Masterpiece
Now for the grand finnon-alcoholic ale: assembling your perfect Crispy Chicken Caesar Sandwich! The combination of the warm, crispy chicken and the cool, zesty dressing is pure magic.

Conclusion:
There you have it! This Crispy Chicken Caesar Sandwich recipe is an absolute winner, bringin extractg together all the beloved flavors of a classic Caesar salad in a convenient and utterly delicious handheld package. The satisfying crunch of the perfectly fried chicken, the tangy and creamy Caesar dressing, the crisp romaine lettuce, and that hint of salty Parmesan create a symphony of textures and tastes that will have you coming back for more. It’s a remarkably versatile meal, perfect for a quick weeknight dinner, a satisfying lunch, or even a casual get-together with friends.
For an elevated experience, I love serving these alongside a light, zesty coleslaw or a simple bowl of sweet potato fries. If you’re feeling adventurous, don’t hesitate to experiment! Consider adding some crispy beef bacon bits for an extra layer of savory goodness, or a sprinkle of red pepper flakes to the chicken dredge for a touch of heat. A thin slice of tomato can also add a refreshing contrast. I truly encourage you to give this recipe a try; I’m confident it will become a staple in your kitchen!
Frequently Asked Questions:
Can I make the chicken ahead of time?
Absolutely! You can bread and fry the chicken pieces a day in advance. Store them in an airtight container in the refrigerator. Reheat them in a toaster oven or an air fryer until warmed through and still crispy before assembling your sandwich.
What kind of bread works best for this sandwich?
A sturdy bun that can hold up to all the delicious fillings is ideal. Brioche buns offer a wonderful softness and slight sweetness, while ciabatta or a good quality sourdough roll provide a chewier texture and great flavor. Toasting the bun lightly is also a fantastic way to prevent soggin extractess and add another layer of texture.
Is there a way to make this sandwich healthier?
For a lighter version, you can opt for baked chicken instead of fried. You could also use whole wheat buns and a lighter, Greek yogurt-based Caesar dressing. Load up on extra lettuce and consider adding some sliced avocado for healthy fats.
Crispy Chicken Caesar Sandwich
A delicious and satisfying sandwich featuring crispy fried chicken cutlets, a creamy homemade Caesar dressing, and fresh ingredients on a bun.
Ingredients
-
½ cup full-fat mayonnaise
-
3 tbsp Greek yogurt
-
1 tsp Dijon mustard
-
1 tsp Worcestershire sauce
-
2 tbsp lemon juice
-
¼ cup Parmesan cheese (freshly grated)
-
1-2 garlic cloves (minced)
-
¼ tsp black pepper
-
Pinch sea salt
-
5 chicken cutlets
-
sea salt (to taste)
-
ground black pepper (to taste)
-
Oil (for frying)
-
⅓ cup all-purpose flour
-
½ tsp salt
Instructions
-
Step 1
In a medium bowl, whisk together mayonnaise, Greek yogurt, Dijon mustard, Worcestershire sauce, lemon juice, Parmesan cheese, minced garlic, ¼ tsp black pepper, and pinch sea salt. This is your Caesar dressing. -
Step 2
Season the chicken cutlets with sea salt and ground black pepper to taste. -
Step 3
In a shallow dish, combine the all-purpose flour, ½ tsp salt, and a pinch of ground black pepper. -
Step 4
Dredge each chicken cutlet in the flour mixture, ensuring it’s evenly coated. -
Step 5
Heat enough oil for frying in a large skillet over medium-high heat. Fry the chicken cutlets for 3-5 minutes per side, or until golden brown and cooked through. Drain on paper towels. -
Step 6
Assemble the sandwiches by spreading a generous amount of Caesar dressing on the buns, placing a crispy chicken cutlet on top, and adding any desired toppings.
Important Information
Nutrition Facts (Per Serving)
It is important to consider this information as approximate and not to use it as definitive health advice.
Allergy Information
Please check ingredients for potential allergens and consult a health professional if in doubt.