Mini Cannoli Cups – Delicious Easy Dessert Recipe
Mini Cannoli Cups are about to become your new favorite dessert obsession, and for good reason! Who can resist the allure of a perfectly crisp shell cradling a sweet, creamy ricotta filling? These delightful little treats capture all the classic charm of their larger counterparts, but in a perfectly portioned, bite-sized package that’s just beggin extractg to be devoured. They’re incredibly versatile – imagin extracte them gracing your next party spread, adding a touch of elegance to a holiday gathering, or simply as a special weekend indulgence for yourself. What truly makes these Mini Cannoli Cups shine is their delightful textural contrast: the satisfying crunch of the shell against the impossibly smooth, decadent filling. Plus, the miniature size makes them guilt-free… well, almost! Prepare to impress yourself and your loved ones with this simple yet spectacular recipe.
Why You’ll Love These Mini Cannoli Cups
The Perfect Bite-Sized Delight
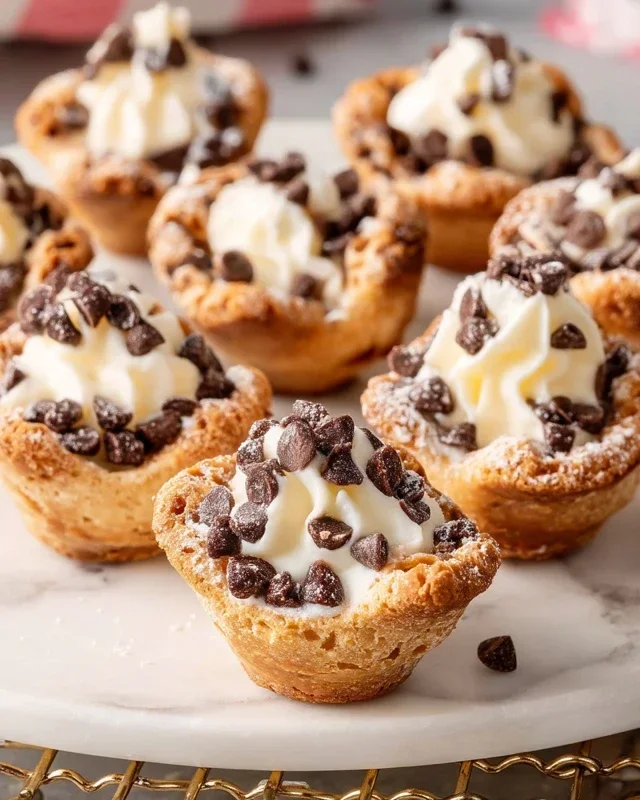
Mini Cannoli Cups
Get ready to delight your taste buds with these adorable and incredibly easy Mini Cannoli Cups! Forget the hassle of rolling and frying traditional cannoli shells. This recipe uses store-bought pie crusts to create a wonderfully crisp, golden cup that perfectly cradles a sweet, creamy ricotta filling. They are perfect for parties, a special dessert, or just a treat for yourself. The best part? They come together so quickly, you can satisfy that cannoli craving in no time!
Ingredients:
Preparing the Ricotta Filling
The heart of any cannoli is its luscious filling, and ours is no exception. To start, ensure your ricotta cheese is well-drained. You can do this by placing it in a fine-mesh sieve lined with cheesecloth or a coffee filter over a bowl for at least 30 minutes, or even overnight in the refrigerator. This step is crucial for achieving a thick, luscious filling that won’t weep. Once drained, transfer the ricotta to a medium bowl. Add the powdered sugar, granulated sugar, finely grated orange or lemon zest (I love the bright citrus notes it adds – use whichever you prefer or a mix!), and vanilla extract. Stir everything together until it’s wonderfully smooth and creamy. Taste it and adjust the sweetness if needed. You can then cover this filling and pop it in the refrigerator while you prepare the crusts. This allows the flavors to meld beautifully.
Crafting the Pie Crust Cups
Now for the ingenious part: using refrigerated pie crusts! Make sure your pie crusts have softened according to the package directions. This makes them much easier to work with and prevents them from cracking.
1. Preheat your oven to 375°F (190°C). Lightly grease a 12-cup muffin tin.
2. Unroll one of the softened pie crusts onto a lightly floured surface. Use a round cookie cutter or a glass that’s slightly larger than the openings of your muffin tin (about 3-4 inches in diameter) to cut out circles. You should aim to get about 6 circles from each crust, so you’ll have enough for 12 cups. Re-roll the scraps gently if needed to get out a few more circles. Repeat with the second pie crust.
3. Carefully press each pie crust circle into a muffin tin cup, gently pushing it down to fit the bottom and up the sides. You want to create a little cup shape. Don’t worry if it’s not perfectly neat; a rustic look is part of the charm!
4. In a small bowl, combine the turbinado sugar and ground cinnamon. This mixture will give our pie crust cups that delightful crunchy texture and warm spice. Sprinkle about half of this cinnamon-sugar mixture evenly over the bottoms and sides of the unbaked pie crust cups. This adds a lovely flavor and a little crunch to the base of our cannoli.
5. Bake the pie crust cups for 10-15 minutes, or until they are golden brown and crisp. Keep a close eye on them, as they can go from perfectly golden to burnt very quickly. Once they’re done, remove the muffin tin from the oven and let them cool in the tin for about 5-10 minutes. This allows them to firm up a bit more. Then, carefully invert the muffin tin onto a wire rack to remove the baked cups. Let them cool completely on the wire rack. This cooling step is vital! Trying to fill warm cups will result in a melted filling.
Assembling Your Mini Cannoli Cups
Once your pie crust cups are completely cool, it’s time for the final, fun part: filling and decorating!
1. Transfer the chilled ricotta filling to a piping bag fitted with a star tip, or simply use a spoon to carefully fill each cooled pie crust cup. If you don’t have a piping bag, you can snip a corner off a sturdy zip-top bag and use that. Filling them just before serving will help keep the crusts as crisp as possible.
2. Sprinkle the remaining cinnamon-sugar mixture around the edges of the filling. Then, generously sprinkle the miniature chocolate chips or finely chopped pistachios over the top of the filling. If you’re using pistachios, they add a beautiful pop of color and a nice nutty crunch.
3. For that classic cannoli finish, dust generously with additional powdered sugar. You can use a small sieve for a delicate, even coating.
These Mini Cannoli Cups are best enjoyed the same day they are assembled to ensure the crispest crust. They are a delightful way to enjoy the flavors of cannoli without all the fuss. Enjoy every bite of these little treasures!

Conclusion:
These Mini Cannoli Cups are an absolute dream for anyone craving that classic cannoli flavor in a perfectly portioned, delightfully easy-to-make treat. We’ve streamlined the process, eliminating the need for tricky frying and instead focusing on simple assembly that delivers big on taste and texture. The crisp, buttery shell combined with the rich, creamy ricotta filling, often enhanced with a hint of citrus or chocolate, makes these a standout dessert for any occasion. They are perfect for parties, holidays, or simply as a sweet indulgence after dinner.
Serving these mini delights is a breeze! Arrange them on a decorative platter for a stunning dessert table centerpiece. They also make wonderful individual treats, perhaps accompanied by a dollop of fresh whipped cream or a dusting of powdered sugar. For variations, feel free to get creative! Stir in mini chocolate chips, chopped pistachios, or even a touch of espresso powder into the ricotta filling for a different flavor profile. You could also experiment with different extracts, like almond or orange blossom water, to personalize your mini cannoli cups.
I truly hope you’ll give this Mini Cannoli Cup recipe a try. It’s so rewarding to create something so delicious from scratch, and the joy on people’s faces when they bite into these little bundles of joy is unbeatable. Happy baking!
Frequently Asked Questions:
Can I make the cannoli shells ahead of time?
Absolutely! The baked pastry shells can be made up to 2 days in advance and stored in an airtight container at room temperature. This makes assembly on the day of serving even quicker!
How long does the filling last?
The ricotta filling is best made fresh just before assembling your mini cannoli cups for optimal flavor and texture. However, if you have leftovers, it can be stored in an airtight container in the refrigerator for up to 2 days. You might notice it thins slightly over time.
What kind of ricotta should I use?
For the best results, I highly recommend using whole milk ricotta cheese. It has a richer flavor and creamier texture compared to part-skim varieties, which is ideal for that authentic cannoli experience.
Mini Cannoli Cups
Delightful mini cannoli cups made with flaky pie crust and a creamy ricotta filling, perfect for a quick sweet treat.
Ingredients
-
1 container whole-milk ricotta cheese (15 oz., drained)
-
1/2 cup powdered sugar
-
2 tablespoons granulated sugar
-
1 teaspoon finely grated orange zest
-
1/2 teaspoon vanilla extract
-
1 box refrigerated pie crusts (2 count)
-
3 tablespoons turbinado sugar
-
1 teaspoon ground cinnamon
-
1/4 cup miniature semisweet chocolate chips
-
additional powdered sugar, for dusting
Instructions
-
Step 1
Preheat oven to 375°F (190°C). Lightly grease a mini muffin tin. -
Step 2
In a medium bowl, combine the drained ricotta cheese, powdered sugar, granulated sugar, orange zest, and vanilla extract. Stir until smooth and well combined. Stir in chocolate chips. -
Step 3
Unroll the pie crusts. Cut each crust into 4 equal squares. Press each square into a greased mini muffin cup, forming a small shell. -
Step 4
Bake for 10-12 minutes, or until the crust is golden brown and crisp. Let cool in the tin for a few minutes before transferring to a wire rack to cool completely. -
Step 5
In a small bowl, mix the turbinado sugar and ground cinnamon. Roll the edges of the cooled cannoli cups in the sugar-cinnamon mixture. -
Step 6
Fill the cooled cannoli cups with the ricotta mixture using a spoon or piping bag. Dust with additional powdered sugar before serving.
Important Information
Nutrition Facts (Per Serving)
It is important to consider this information as approximate and not to use it as definitive health advice.
Allergy Information
Please check ingredients for potential allergens and consult a health professional if in doubt.