Hearty Homemade Beef Stew Recipe – Cozy Comfort Food
Homemade beef stew is more than just a meal; it’s a warm embrace on a chilly evening, a culinary hug that whispers tnon-alcoholic ales of comfort and tradition. There’s a reason why this timeless classic remains a beloved staple in kitchens worldwide. It’s the deep, savory flavors that meld together, creating a symphony of deliciousness with every spoonful. Think tender, melt-in-your-mouth beef, hearty vegetables like carrots and potatoes, all swimming in a rich, velvety broth that’s been simmering to perfection.
What makes this homemade beef stew truly special is its ability to transform simple ingredients into something extraordinary.
It’s a dish that’s forgiving enough for a begin extractner but rewarding enough for the most seasoned home cook. The aroma that fills your kitchen as it cooks is an experience in itself, promising a satisfying and soul-warming feast. Whether you’re gathering the family around the table or simply looking for a comforting solo meal, this homemade beef stew recipe is sure to become a cherished favorite.
Homemade Beef Stew
There’s something incredibly comforting about a simmering pot of beef stew. The rich aroma filling your kitchen, the tender chunks of beef melting in your mouth, and the hearty vegetables soaking up all that delicious flavor – it’s a culinary hug in a bowl. While store-bought versions can be convenient, nothing beats the satisfaction of making this classic dish from scratch. My homemade beef stew recipe is designed to be straightforward, relying on simple, wholesome ingredients that create a depth of flavor you won’t soon forget. Perfect for a chilly evening or a weekend gathering, this stew is guaranteed to be a crowd-pleaser. Let’s get started on creating this comforting masterpiece!
Ingredients:
Cooking Instructions:
Step 1: Prepare the Beef for Searing
Before we dive into the cooking, it’s crucial to properly prepare our beef. Take your 2-pound chuck roast, which you’ve already cut into generous 2-inch chunks, and pat it thoroughly dry with paper towels. This step is absolutely key for achieving a beautiful sear. Moisture on the surface of the meat will steam rather than brown, and that browning is where a lot of the foundational flavor for our stew comes from. Once dried, season the beef generously with 1 teaspoon of Kosher salt and ½ teaspoon of coarsely ground black pepper. Ensure each piece is coated evenly. Next, in a medium bowl, toss the seasoned beef chunks with 2 tablespoons of gluten-free all-purpose flour (or whole wheat flour if gluten isn’t a concern). This flour coating will help thicken the stew later on and also contributes to the golden-brown crust on the beef.
Step 2: Sear the Beef for Deep Flavor
Now it’s time to build that rich, savory base. Heat 2 tablespoons of olive oil or avocado oil in a large, heavy-bottomed pot or Dutch oven over medium-high heat. You want the oil to be shimmering but not smoking. Carefully add the floured beef chunks to the hot pot in a single layer. It’s important not to overcrowd the pot, as this will also lead to steaming instead of searing. You may need to work in batches. Sear the beef for about 2-3 minutes per side, until it’s deeply browned and a beautiful crust has formed. This browning process, known as the Maillard reaction, is essential for developing the complex flavor profile of the stew. Once seared, remove the beef from the pot with a slotted spoon and set it aside on a plate. Don’t clean the pot; those browned bits stuck to the bottom are pure flavor gold!
Step 3: Sauté the Aromatics and Vegetables
Reduce the heat to medium and add the chopped ½ large yellow onion to the same pot. Stir and scrape the bottom of the pot to loosen any browned bits from the beef. Cook the onion for about 5-7 minutes, or until it’s softened and translucent. Then, add the 4 minced garlic cloves and cook for another minute until fragrant. Be careful not to burn the garlic. Now, add your chopped 1 large carrot and diced 2 Yukon Gold potatoes to the pot. Stir everything together to coat the vegetables with the residual oil and browned bits. Sauté for another 3-5 minutes, just to give the vegetables a slight head start and begin extract to soften them.
Step 4: Deglaze and Build the Liquid Base
This step is where we unlock all those delicious flavors left in the bottom of the pot. Pour in 2 cups of beef broth, scraping vigorously with a wooden spoon to loosen and incorporate all the browned bits from the bottom of the pot. This is crucial for a deeply flavored stew! Once the bottom is clean, stir in ¼ cup of tomato paste and 1 tablespoon of Worcestershire sauce. The tomato paste adds a wonderful depth of flavor and a subtle tang, while the Worcestershire sauce brings umami and a touch of complexity. Bring the liquid to a simmer, stirring to ensure the tomato paste is fully incorporated.
Step 5: Simmer and Infuse with Herbs
Return the seared beef chunks (and any accumulated juices from the plate) to the pot. Add the 1 bay leaf and 2 teaspoons of fresh thyme leaves. Stir everything together to make sure the beef is mostly submerged in the liquid. Once the stew comes back up to a gentle simmer, reduce the heat to low, cover the pot tightly, and let it cook. You’re looking for a slow, gentle simmer – not a rolling boil. This is where the magic happens, allowing the beef to become incredibly tender and the flavors to meld beautifully. Let the stew simmer for at least 1.5 to 2 hours, or until the beef is fork-tender and the vegetables are cooked through. Stir occasionally to prevent sticking. For an even richer flavor, you can let it simmer for up to 3 hours.
Step 6: Final Touches and Serving
Once the stew has simmered and the beef is wonderfully tender, remove the bay leaf. Taste the stew and adjust seasoning if necessary, adding more salt and pepper to your preference. If the stew seems a little too thin for your liking, you can thicken it further by making a slurry of 1 tablespoon of cornstarch or flour mixed with 2 tablespoons of cold water, then stirring it into the simmering stew and cooking for a few more minutes until thickened. Serve your glorious homemade beef stew hot, perhaps with a crusty bread for dipping. The rich, savory broth, tender beef, and perfectly cooked vegetables make this a truly satisfying and comforting meal. Enjoy every delicious spoonful!

Conclusion:
And there you have it – your guide to creating a truly exceptional homemade beef stew! This recipe is fantastic because it yields a rich, deeply flavorful stew that’s incredibly comforting and satisfying. The slow simmering process allows the beef to become wonderfully tender, while the vegetables absorb all those delicious savory notes. It’s the kind of meal that warms you from the inside out and makes your kitchen smell absolutely incredible.
I love serving this beef stew with a crusty baguette for soaking up every last drop of that gorgeous gravy, or perhaps alongside some fluffy mashed potatoes. For variations, don’t be afraid to experiment! You can add different root vegetables like parsnips or turnips, a splash of red grape juice for an extra layer of complexity, or even some mushrooms for added earthiness. The possibilities are truly endless for this versatile dish.
I truly encourage you to give this homemade beef stew recipe a try. It’s simpler than you might think, and the reward of a home-cooked, soul-warming meal is absolutely worth it. Gather your ingredients, set aside some time, and prepare to impress yourself and your loved ones with this classic comfort food.
Frequently Asked Questions:
Can I make this beef stew ahead of time?
Absolutely! In fact, beef stew often tastes even better the next day. The flavors have more time to meld and deepen. Simply cool it completely, then store it in an airtight container in the refrigerator for up to 3-4 days. Reheat gently on the stovetop or in the oven.
What are the best cuts of beef for stew?
For a tender and flavorful homemade beef stew, I recommend tougher, less expensive cuts like chuck roast, brisket, or round. These cuts have connective tissue that breaks down during slow cooking, resulting in incredibly tender beef.
How can I thicken my beef stew if it’s too thin?
If your stew isn’t as thick as you’d like, you have a few options. You can create a slurry by whisking together a tablespoon of cornstarch or flour with two tablespoons of cold water, then stirring it into the simmering stew. Alternatively, you can mash some of the cooked vegetables against the side of the pot to release their starches and thicken the broth naturally.
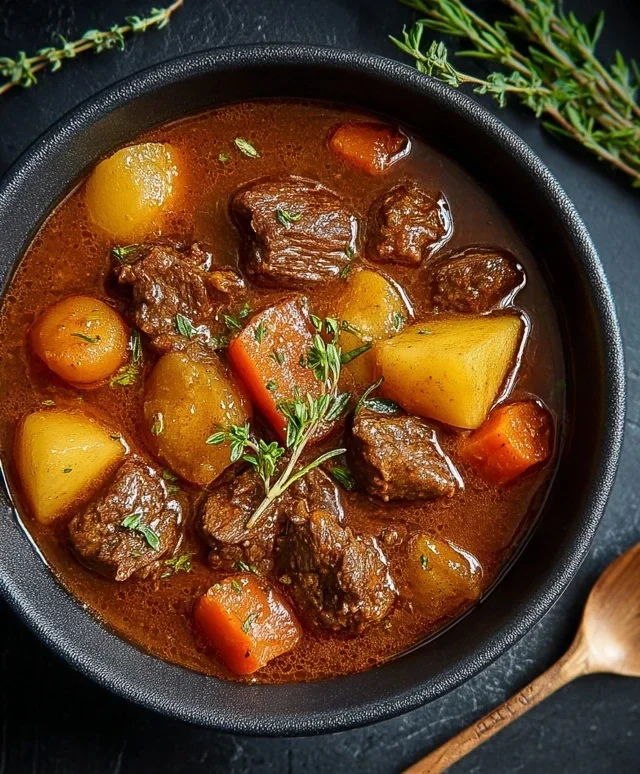
Homemade Beef Stew
A hearty and comforting homemade beef stew, perfect for a chilly evening. This recipe features tender beef chuck roast slow-cooked with vegetables in a rich broth.
Ingredients
-
2 pounds Beef Chuck Roast, cut into 2-inch chunks, excess fat removed
-
1 teaspoon Kosher Salt
-
½ teaspoon Coarsely Ground Black Pepper
-
2 tablespoons Gluten-free All-Purpose Flour
-
2 tablespoons Olive Oil
-
½ Large Yellow Onion, chopped
-
4 Garlic Cloves, minced
-
1 Large Carrot, cut into 2-inch chunks
-
2 Yukon Gold Potatoes, diced into 2-inch pieces
-
2 Cups Beef Broth
-
¼ Cup Tomato Paste
-
1 tablespoon Worcestershire Sauce
-
1 Bay Leaf
-
2 teaspoons Fresh Thyme Leaves
Instructions
-
Step 1
Pat the beef dry with paper towels. In a bowl, toss the beef with salt, pepper, and flour until evenly coated. -
Step 2
Heat olive oil in a large Dutch oven or heavy-bottomed pot over medium-high heat. Brown the beef in batches on all sides, about 2-3 minutes per side. Remove beef and set aside. -
Step 3
Add the chopped onion to the pot and cook until softened, about 5 minutes. Add the minced garlic and cook for another minute until fragrant. -
Step 4
Stir in the tomato paste and cook for 1 minute. Return the browned beef to the pot. Add the beef broth, Worcestershire sauce, bay leaf, and thyme. -
Step 5
Bring the stew to a simmer, then reduce heat to low, cover, and cook for 1.5 to 2 hours, or until the beef is tender. -
Step 6
Add the carrots and potatoes to the pot. Cover and continue to simmer for another 30-45 minutes, or until vegetables are tender. -
Step 7
Remove the bay leaf before serving. Adjust seasoning with salt and pepper if needed.
Important Information
Nutrition Facts (Per Serving)
It is important to consider this information as approximate and not to use it as definitive health advice.
Allergy Information
Please check ingredients for potential allergens and consult a health professional if in doubt.