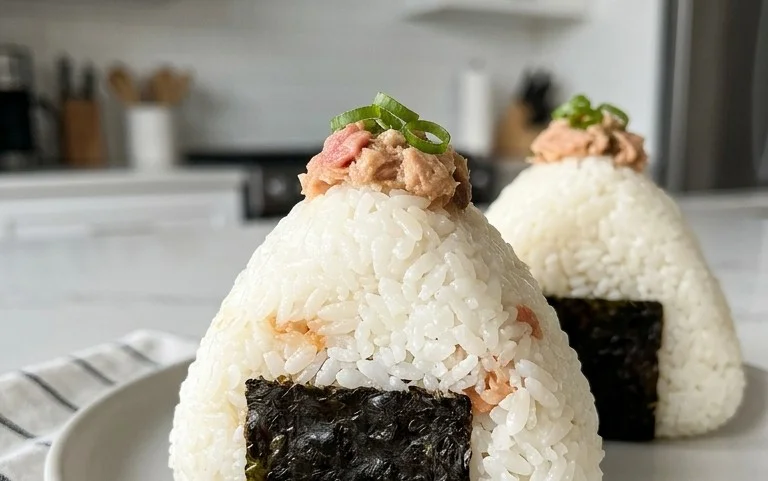
Easy Japanese Tuna Onigiri Recipe
15-min. Easy Japanese Tuna Onigiri are more than just a quick snack; they’re a comforting embrace in rice form. Have you ever craved something satisfying, savory, and incredibly simple to whip up when hunger strikes? That’s where these delightful rice balls shine. We absolutely adore them because they hit that perfect sweet spot of being incredibly versatile and packed with flavor, all without demanding hours in the kitchen. What makes this particular 15-min. Easy Japanese Tuna Onigiri so special is the winning combination of fluffy rice, the umami-rich tuna filling, and the subtle, satisfying texture of toasted nori. It’s a taste of Japan that’s accessible to everyone, making it a go-to for busy lunches, on-the-go meals, or even a late-night craving. Get ready to discover your new favorite speedy culinary creation!
Why You’ll Love This Recipe
This recipe is designed for maximum flavor with minimal fuss.
What Makes This Dish So Special
The classic tuna mayo filling is a universally loved combination, elevated by the perfect rice-to-filling ratio and the satisfying crunch of seaweed.
Ingredients:
Crafting Quick & Delicious Japanese Tuna Onigiri in 15 Minutes
When hunger strikes and time is of the essence, reaching for something quick, satisfying, and utterly delicious is key. Enter the Japanese Tuna Onigiri – a humble yet incredibly versatile rice ball that’s a staple in bento boxes and a perfect on-the-go snack. Forget complicated culinary endeavors; this recipe is designed for speed and simplicity, bringin extractg the comforting flavors of Japan right to your kitchen in under 15 minutes. We’re going to transform a few simple ingredients into portable parcels of pure joy.
The beauty of onigiri lies in its adaptability. While this recipe focuses on a classic tuna mayonnaise filling, the base of perfectly seasoned rice and the satisfying chew of nori is universally loved. We’ll be using canned tuna, which is readily available and incredibly convenient, making this an accessible recipe for even the busiest of days. The Japanese mayonnaise adds a delightful creaminess and a subtle tang that perfectly complements the tuna, while a touch of salt enhances the natural flavors of the rice. And if you have a little extra time or are making rice specifically for this, be sure to check the notes section below for tips on achieving that ideal onigiri rice texture. Let’s get started on this culinary adventure!
Preparing the Tuna Filling
The heart of our onigiri lies in its filling, and for this quick version, it’s incredibly straightforward. The first step is to prepare your canned tuna. Open your can of tuna and drain it thoroughly. If you’re using tuna packed in oil, draining it well is crucial to avoid an overly greasy filling. For tuna packed in water, ensure it’s also well-drained. Once drained, place the tuna in a small bowl. Now, add the Japanese mayonnaise. If you don’t have Japanese mayo readily available, regular mayonnaise will work in a pinch, though Japanese mayo offers a slightly richer, tangier flavor profile that is distinctively delicious. Gently flake the tuna with a fork and mix it with the mayonnaise until it’s well combined and forms a creamy, cohesive mixture. Don’t overmix; we want a little texture from the tuna flakes. This simple step ensures our filling is ready to be enveloped by the warm, fluffy rice.
Seasoning and Preparing the Rice
The foundation of any good onigiri is well-seasoned rice. You’ll need 2 cups of cooked short-grain rice. It’s important that the rice is still warm when you begin extract forming the onigiri. This warmth helps the rice stick together and makes it pliable for shaping. If your rice has cooled completely, you can gently reheat it in the microwave or on the stovetop until it’s warm to the touch. Sprinkle the 1/2 teaspoon of salt evenly over the warm rice. Now, using a rice paddle or a spoon, gently fold the salt into the rice. The goal here is to distribute the salt evenly without mashing the grains. The warm rice will absorb the salt beautifully, providing a subtle but essential flavor boost that elevates the entire onigiri experience. Some people prefer to add a touch of rice vinegar to the rice for extra flavor, but for this 15-minute recipe, salt is perfectly sufficient and keeps things incredibly simple.
Shaping the Onigiri
This is where the magic happens! It’s helpful to have a small bowl of water and a pinch of salt nearby. Wet your hands slightly with the water and rub a tiny bit of salt onto your palms. This prevents the rice from sticking to your hands and seasons the outside of the onigiri. Take about 1/4 to 1/3 cup of the warm, seasoned rice and place it in the palm of your hand. Gently flatten the rice into a disc shape. Now, create a small indentation in the center of the rice disc. Spoon about a tablespoon of your prepared tuna filling into this indentation. Be careful not to overfill it, as it will make shaping more difficult. Now, bring the edges of the rice up and around the filling, gently enclosing it. Begin extract to gently cup your hands and press the rice together, forming it into your desired shape. The classic onigiri shapes are a triangle or a simple ball. For a triangle, use your thumb and index finger to create corners while gently pressing and turning the rice ball. If it starts to feel sticky, re-wet your hands and add a pinch more salt. Don’t worry if your first few aren’t perfectly shaped; practice makes perfect, and even a slightly imperfect onigiri tastes delicious!
Wrapping with Nori
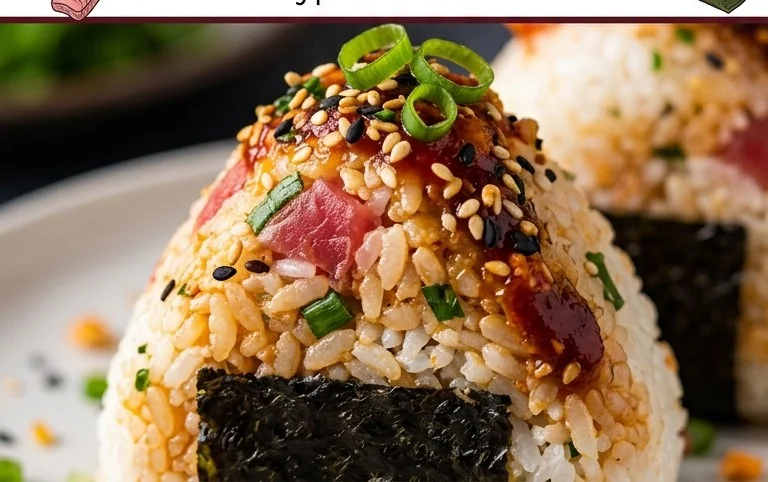
For the nori, you can use full sheets, or if you prefer less nori or want smaller onigiri, you can cut the sheets in half. If using full sheets, cut them into strips about 1-inch wide. Take one of your formed rice balls. If you’re using a strip of nori, wrap it around the base or one side of the onigiri. The slight moisture on the rice should help the nori adhere. If you want to use the nori to wrap the entire onigiri, you can cut a larger piece and carefully wrap it, pressing gently to secure. For a triangle onigiri, a strip of nori often looks like a belt or a cape. If you are using the larger 1/2 sheet option for less nori, you’ll likely want to wrap it around the base and gently press to secure. The nori adds a wonderful salty, oceanic flavor and a satisfying textural contrast to the soft rice.
Garnishing and Serving
The final step is optional but highly recommended for an extra touch of flavor and visual appeal: garnishing with sesame seeds. If you’re using sesame seeds, sprinkle them over the outside of your onigiri. They’ll stick nicely to the slightly moist surface of the rice. You can also toast the sesame seeds lightly in a dry pan for a more intense nutty flavor before sprinkling. Your 15-minute Japanese Tuna Onigiri is now ready to be enjoyed! These are best served warm or at room temperature. They are perfect for a quick lunch, a snack between meals, or packed into a lunchbox for an easy and satisfying meal on the go. You can make a batch of these ahead of time, and they will keep well in the refrigerator for a day or two, though the nori may soften.
Enjoy the simple pleasure and deliciousness of your homemade onigiri!
Conclusion:
There you have it – your delicious and incredibly quick Japanese Tuna Onigiri, ready in just 15 minutes! This recipe truly shines because it’s the perfect solution for busy schedules without sacrificing flavor or authenticity. Whether you need a speedy breakfast, a satisfying lunch on-the-go, or a light and healthy snack, these tuna onigiri are a winner. The combination of fluffy rice, savory tuna, and a hint of umami is incredibly rewarding, and the fact that you can whip them up so fast makes them even more appealing.
I love serving these onigiri as is, perhaps with a small side of pickled gin extractger or a sprinkle of sesame seeds for extra flair. They are also fantastic packed in a bento box alongside some edamame or a simple green salad. For variations, feel free to experiment with your favorite additions! Consider adding a dash of sriracha for a spicy kick, a bit of chopped chives for freshness, or even some finely diced cucumber for crunch. Don’t be afraid to make them your own!
I truly encourage you to give this Japanese Tuna Onigiri recipe a try. It’s a fundamental Japanese comfort food that’s surprisingly easy to master. You’ll be surprised at how satisfying and delicious homemade onigiri can be, and the minimal effort involved is a huge bonus. So, gather your ingredients and get ready to enjoy a taste of Japan in no time!
Frequently Asked Questions:
Can I make the rice ahead of time?
Absolutely! For an even faster assembly, cook your sushi rice in advance and let it cool completely. You can store it in the refrigerator for up to two days. When you’re ready to make your onigiri, gently warm the rice slightly before shaping – this makes it easier to handle and prevents it from being too hard.
What kind of tuna should I use?
Canned tuna packed in oil or water both work well. If using tuna in oil, drain it thoroughly. If you prefer a milder flavor, you can opt for tuna in water. The mayonnaise is key for binding and flavor, so don’t skip it!
15-min. Easy Japanese Tuna Onigiri
Quick and simple Japanese tuna rice balls, perfect for a fast meal or snack. Uses common pantry staples for an authentic flavor.
Ingredients
-
2 cups cooked short grain rice
-
1/2 tsp salt
-
5.29 oz canned tuna (in oil recommended, or canned tuna in water)
-
2 tbsp Japanese mayo
-
2 sheets nori
-
1 tsp sesame seeds
Instructions
-
Step 1
In a bowl, mix the cooked short-grain rice with salt. Allow it to cool slightly until it’s comfortable to handle. -
Step 2
Drain the canned tuna well. In a separate small bowl, combine the drained tuna with Japanese mayonnaise. Mix until well incorporated. -
Step 3
Wet your hands with water and lightly salt them to prevent sticking. Take a portion of the seasoned rice (about 1/2 cup) and flatten it in your palm. -
Step 4
Place a spoonful of the tuna-mayo mixture in the center of the flattened rice. Gently fold the rice around the filling, shaping it into a triangle or ball. -
Step 5
Cut the nori sheets into strips or desired shapes. Wrap the onigiri with nori, if desired. -
Step 6
Garnish with sesame seeds, if using. Repeat with the remaining rice and tuna mixture.
Important Information
Nutrition Facts (Per Serving)
It is important to consider this information as approximate and not to use it as definitive health advice.
Allergy Information
Please check ingredients for potential allergens and consult a health professional if in doubt.