Red White Blue Dirt Cups-Festive Patriotic Dessert
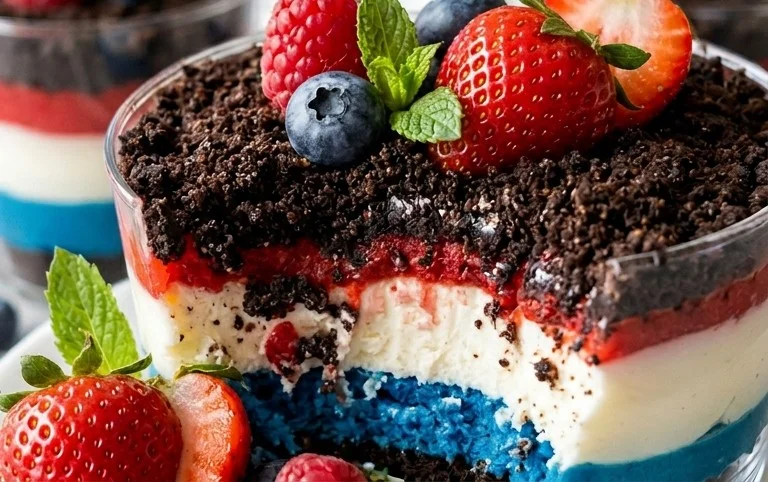
Red, White and Blue Dirt Cups are more than just a dessert; they’re a nostalgic trip back to childhood, a burst of festive fun, and an incredibly easy way to impress at any gathering. I absolutely adore making these vibrant, layered treats because they capture the spirit of celebration with minimal fuss. Think about it: who doesn’t get a smile from a fun, no-bake dessert that looks as good as it tastes? The magic of these Red, White and Blue Dirt Cups lies in their simplicity and their irresistible combination of textures and flavors. We’re talking about creamy pudding, crunchy cookie crum extractbles, and sweet, fresh fruit – all coming together in a delightful edible landscape. They’re perfect for summer barbecues, patriotic holidays, or just a fun afternoon project with the kids. Get ready to dig into this crowd-pleasing classic!

Red, White and Blue Dirt Cups
Get ready to unleash your inner child with these incredibly fun and festive Red, White and Blue Dirt Cups! Perfect for patriotic holidays like the Fourth of July, Memorial Day, or any summer gathering, these treats are as delightful to make as they are to eat. We’re taking the classic chocolate pudding dirt cups and giving them a vibrant, patriotic twist that will wow your guests. The beauty of this recipe is its simplicity, making it a fantastic activity to do with kids, or a quick and impressive dessert for yourself. The creamy pudding, the crunchy “dirt,” and the fun gummy worms all come together to create a dessert that’s both nostalgic and new.
Ingredients:
Instructions:
1. Prepare the Pudding Base: The foundation of our dirt cups is a luscious, creamy pudding. In a large mixing bowl, combine the contents of your two cheesecake flavored pudding boxes. Now, pour in the 4 cups of milk. Whisk these ingredients together vigorously for about two minutes, or until the pudding mixture begin extracts to thicken. It’s important to whisk thoroughly to ensure there are no lumps and that the pudding achieves a smooth, velvety consistency. Once it’s thickened, cover the bowl with plastic wrap, making sure the wrap touches the surface of the pudding. This step is crucial to prevent a “skin” from forming on top. Place the pudding in the refrigerator to set for at least 30 minutes, allowing it to firm up to the perfect texture for our dirt cups.
2. Create the “Dirt”: For the iconic “dirt” effect, we’ll be using our Oreo cookies. Take your 19 Oreo cookies and place them into a sturdy zip-top bag. Seal the bag tightly, pressing out as much air as possible. Now comes the fun part – the crushing! You can use a rolling pin, the bottom of a heavy glass, or even just your hands to break down the cookies into fine crum extractbs. Aim for a texture that resembles rich, dark soil. Don’t worry if there are a few slightly larger pieces; these can add to the rustic “dirt” look. You want a good amount of crum extractbs, so don’t be shy with the crushing! Once you have your crum extractbly “dirt,” set it aside in a bowl.
3. Divide and Dye the Pudding: Now, it’s time to inject some patriotic color into our pudding! Take your chilled, thickened pudding and divide it evenly into three separate bowls. We’ll be coloring two of these bowls. In the first colored bowl, add the ¼ teaspoon of red gel food dye. Stir gently but thoroughly until the pudding is a vibrant, even red. Gel food coloring is best because it imparts intense color without adding extra liquid, which could make your pudding runny. In the second colored bowl, add the ¼ teaspoon of blue gel food dye. Mix this until you achieve a beautiful, deep blue hue. The third bowl will remain plain white, representing the “white” in our Red, White, and Blue theme. You should now have three bowls of pudding: white, red, and blue.
4. Assemble the Dirt Cups: This is where the magic happens and our dirt cups start to take shape! Grab your serving cups or small jars. Begin extract by layering a spoonful of the white pudding at the bottom of each cup. This will be our base layer. Next, carefully spoon a layer of the red pudding on top of the white. Try to keep the layers distinct for a visual appeal. Then, add a layer of the blue pudding. After you’ve added your colored pudding layers, it’s time to sprinkle a generous amount of your crushed Oreo “dirt” over the top of the blue pudding. Make sure to cover the pudding completely, creating the illusion of a freshly dug patch of earth. You want a good, thick layer of “dirt” for that authentic dirt cup look.
5. Add the Finishing Touches: To complete our festive dirt cups, we need to add the final, whimsical elements. Take your red and blue gummy worms and artfully stick them into the “dirt” on top of your cups. Let a few peek out, as if they’re emergin extractg from the ground. You can also add a few more crum extractbles of Oreo “dirt” around the gummy worms to enhance the effect. For an extra touch of flair, you can even sprinkle a tiny bit of the “dirt” on the rim of the cup. Repeat this layering and decorating process for all your serving cups. Once assembled, these Red, White and Blue Dirt Cups are ready to be chilled in the refrigerator for another 15-20 minutes before serving. This allows the flavors to meld and the pudding to firm up further, making them even more delicious. These are best enjoyed cold and will be a guaranteed hit at any celebration!
Conclusion:
And there you have it! These Red, White and Blue Dirt Cups are a guaranteed hit for any occasion, especially during those patriotic holidays or fun summer gatherings. Their simplicity, combined with the delightful crunch of cookie crum extractbs and the creamy sweetness of pudding and whipped topping, makes them incredibly appealing. The vibrant layers are not only visually stunning, evoking the spirit of the flag, but they also offer a delightful textural contrast that everyone will adore. They’re so easy to assemble that even the youngest chefs can get involved, making it a fantastic activity for families.
For serving, these dirt cups are perfect as individual desserts in clear cups or mason jars, allowing the beautiful layers to shine. You can also prepare them in a larger trifle dish for a communal dessert experience. Don’t be afraid to get creative with variations! Consider adding a layer of fresh berries like strawberries and blueberries between the pudding layers for an extra burst of freshness. If you’re feeling adventurous, a sprinkle of red or blue edible glitter on top can add a touch of sparkle. I truly encourage you to give this recipe a try; it’s such a fun and delicious way to celebrate!
Frequently Asked Questions about Red, White and Blue Dirt Cups:
Q: Can I make these dirt cups ahead of time?
Absolutely! These Red, White and Blue Dirt Cups are fantastic for making ahead. I recommend assembling them up to 24 hours in advance. Store them covered in the refrigerator. The cookie crum extractbs will soften slightly, which I actually find enhances the “dirt cup” experience. Just be aware that the whipped topping might deflate a little over a longer period, so if you want it perfectly fluffy, add it closer to serving time.
Q: What kind of pudding is best for this recipe?
For this specific recipe, a standard chocolate pudding is traditional and delicious, providing that “dirt” element. However, you can certainly customize it! Vanilla pudding layered with red and blue food coloring can create a different but equally festive look. You could even use a cheesecake flavored pudding for a richer taste. The key is to ensure your pudding is prepared according to package directions so it has a good, firm set.
Q: Are there any ways to make this recipe healthier?
While dirt cups are designed as a treat, you can make some adjustments for a slightly healthier version. Instead of traditional cookies, consider using crushed grabeef ham crackers or even a whole wheat chocolate cookie. For the pudding, you could opt for a sugar-free version. You can also incorporate fresh fruit like sliced strawberries and blueberries as a primary filling component, layering them with a lighter whipped topping or Greek yogurt for a tangier profile.
Red, White and Blue Dirt Cups
A festive and easy-to-make dessert featuring layers of creamy pudding, crushed Oreos, and patriotic gummy worms.
Ingredients
-
2 boxes cheesecake pudding (3.4 ounces each)
-
4 cups milk
-
19 Oreo cookies (crushed)
-
¼ teaspoon red gel food dye
-
¼ teaspoon blue gel food dye
-
8 red and blue gummy worms
Instructions
-
Step 1
Prepare the pudding: In a large bowl, whisk together the cheesecake pudding mix and milk until smooth and thickened. Let stand for 5 minutes. -
Step 2
Divide and color: Divide the pudding into three equal portions. Leave one portion white. To the second portion, add the red gel food dye and stir until evenly colored. To the third portion, add the blue gel food dye and stir until evenly colored. -
Step 3
Assemble the layers: In individual serving cups or a larger dish, begin layering the ingredients. Start with a layer of crushed Oreo cookies (dirt). -
Step 4
Add pudding layers: Spoon alternating layers of white, red, and blue pudding over the Oreo layer. -
Step 5
Repeat layers: Continue layering crushed Oreos and pudding until the cups are full, ending with a layer of “dirt” (crushed Oreos). -
Step 6
Decorate: Insert one red and blue gummy worm into each dirt cup, resembling worms crawling out of the dirt. -
Step 7
Chill: Refrigerate for at least 30 minutes before serving to allow the pudding to set.
Important Information
Nutrition Facts (Per Serving)
It is important to consider this information as approximate and not to use it as definitive health advice.
Allergy Information
Please check ingredients for potential allergens and consult a health professional if in doubt.