Buster Bar Ice Cream Dessert- Easy No-Bake Treat
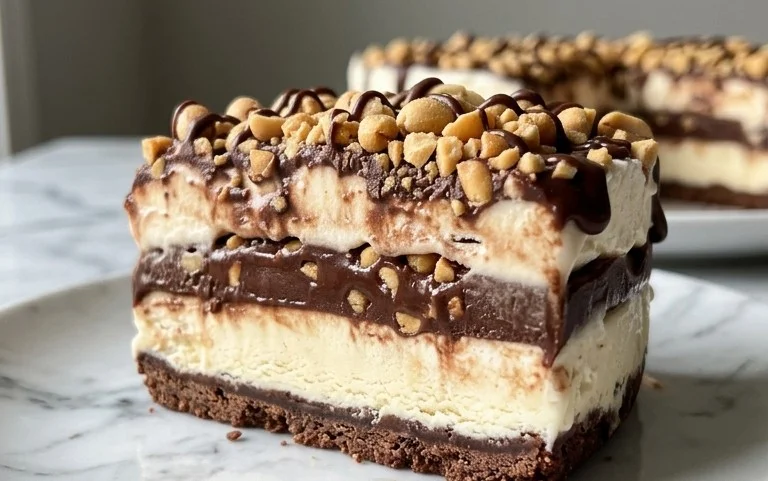
Buster Bar Ice Cream Dessert is more than just a treat; it’s a nostalgic trip down memory lane for many of us! Remember those iconic, foil-wrapped delights that were the undisputed kings of the freezer aisle? Well, I’ve cracked the code to recreate that magic in your own kitchen. This isn’t just a copycat recipe; it’s a loving homage to the beloved Buster Bar, a dessert that has captured hearts (and taste buds) with its perfect harmony of textures and flavors. People adore the Buster Bar Ice Cream Dessert because it effortlessly blends creamy vanilla ice cream with a crunchy, chocolatey coating and a surprise peanut center, all enrobed in that signature, slightly chewy chocolate shell. It’s the ultimate frozen indulgence, a layered masterpiece that promises pure, unadulterated joy with every single bite. Get ready to experience a taste of childhood bliss like never before!
Buster Bar Ice Cream Dessert
Get ready to experience a taste of pure nostalgia with this incredible Buster Bar Ice Cream Dessert! This recipe is a delightful tribute to the classic frozen treat, bringin extractg together the satisfying crunch of Oreos, creamy vanilla ice cream, the nutty goodness of peanuts, and a rich chocolatey shell. It’s perfect for a summer gathering, a special occasion, or just when you’re craving something utterly delicious. This dessert is surprisingly easy to make and the result is a showstopper that will have everyone asking for seconds.
Ingredients:
Instructions:
Creating the Oreo Crust
The foundation of our Buster Bar dessert is a rich and crunchy Oreo crust. To achieve this, you’ll want to finely crush your Oreo cookies. You can do this by placing them in a food processor and pulsing until they reach a fine crum extractb consistency. Alternatively, if you don’t have a food processor, you can place the cookies in a large zip-top bag, seal it tightly, and then use a rolling pin to crush them. Once your Oreos are crushed, transfer them to a medium-sized bowl. Next, pour in the 1/2 cup of melted butter. Stir everything together until the cookie crum extractbs are evenly moistened by the butter. This will help the crust hold its shape.
Assembling the Base Layer
Now it’s time to press this delicious Oreo mixture into your baking pan. I recommend using a 9×13 inch baking pan for this recipe. You can line the pan with parchment paper for easy removal later, or simply press the mixture directly into the pan. Use the bottom of a glass or your hands to firmly and evenly press the Oreo crum extractb mixture into the bottom of the pan. This creates a sturdy base for our ice cream layer. Once pressed, place the pan in the freezer for about 10-15 minutes to allow the crust to firm up slightly. This will prevent it from mixing too much with the ice cream.
Layering the Ice Cream and Peanuts
This is where things really start to take shape and get exciting! Remove your pan with the chilled Oreo crust from the freezer. Now, take your softened vanilla ice cream and spread it evenly over the crust. Ensure you get a nice, consistent layer. Don’t worry if it’s not perfectly smooth; a little texture is good! Now for the peanuts! You can lightly chop some of the Spanish peanuts if you prefer smaller pieces, or leave them whole for more crunch. Sprinkle the peanuts generously and evenly over the softened ice cream. Press them down gently so they adhere to the ice cream layer. Once this layer is complete, return the entire pan to the freezer for at least 2-3 hours, or until the ice cream is completely firm. This step is crucial for a clean slice later on. The longer it freezes, the firmer it will get.
Crafting the Chocolatey Coating
While our ice cream base is freezing solid, we’ll prepare the decadent chocolate coating. In a medium saucepan, combine the 12 oz of semi sweet chocolate chips, the remaining 1/2 cup of butter, and the 12 oz of evaporated milk. Place the saucepan over low heat. Stir the mixture constantly, making sure to scrape the bottom and sides of the pan to prevent scorching. You want the chocolate chips and butter to melt completely and combine smoothly with the evaporated milk. Continue to stir until the mixture is smooth and glossy. Once the chocolate mixture is fully melted and smooth, remove it from the heat.
Adding the Sweet Dusting and the Final Touch
Now, it’s time to add the final touches that make this Buster Bar dessert so special. You’ll want to sift the 2 cups of powdered confectioner’s sugar over the chocolate mixture in the saucepan. Gently whisk the powdered sugar into the warm chocolate until it is fully incorporated and you have a smooth, thick, and fudgy coating. Be patient here; you want to ensure there are no lumps of powdered sugar. The goal is a rich, pourable, yet thick chocolate fudge sauce. Remove the frozen ice cream and peanut layer from the freezer. Immediately pour the warm chocolate fudge mixture evenly over the top of the ice cream, ensuring it covers the entire surface and flows down the sides a bit. Work quickly, as the cold ice cream will start to set the chocolate.
Freezing and Serving Your Masterpiece
Once the chocolate coating has been applied, gently tap the pan on the counter a few times to help spread the chocolate evenly and remove any air bubbles. Now, return the entire dessert to the freezer for at least another 1-2 hours, or until the chocolate shell is firm. This allows the chocolate to harden completely, creating that signature shell. When you’re ready to serve, let the dessert sit at room temperature for about 5-10 minutes. This will make it easier to cut. Use a sharp knife, warmed slightly under hot water and dried, to cut the Buster Bar dessert into your desired portions. Enjoy this incredible homemade treat that’s sure to bring a smile to everyone’s face!
Conclusion:
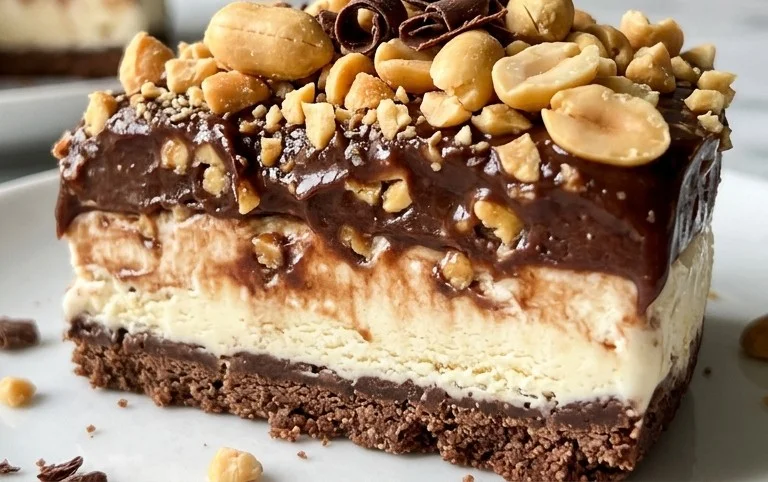
And there you have it! This Buster Bar Ice Cream Dessert is an absolute winner for so many reasons. It’s incredibly easy to assemble, making it perfect for those spontaneous dessert cravings or for when you need a crowd-pleaser without a lot of fuss. The combination of creamy ice cream, crunchy peanuts, and that irresistible chocolate coating is a nostalgic trip back to childhood, but elevated with homemade goodness. It’s a truly satisfying and delicious treat that will have everyone asking for seconds.
For serving, I love to slice this Buster Bar Ice Cream Dessert into generous portions and serve it immediately. A drizzle of extra hot fudge or a dollop of whipped cream can take it to the next level. If you’re feeling adventurous, consider variations! You could swap the peanuts for toasted almonds or chopped pecans. Perhaps experiment with different ice cream flavors like mint chocolate chip or cookies and cream. The possibilities are truly endless when you start with such a fantastic base.
I wholeheartedly encourage you to give this recipe a try. It’s a fun and rewarding dessert to make, and the pure joy on people’s faces when they take their first bite is priceless. So gather your ingredients and get ready to create your own delightful Buster Bar Ice Cream Dessert!
Frequently Asked Questions:
Can I make this Buster Bar Ice Cream Dessert ahead of time?
Yes, absolutely! This dessert is best assembled and frozen until firm. You can make it a day or two in advance and keep it tightly wrapped in the freezer. Just let it sit at room temperature for about 5-10 minutes before slicing and serving to make it easier to cut.
What kind of chocolate is best for the coating?
For the best melt and snap, I recommend using good quality semi-sweet or milk chocolate chips. You can also use chopped chocolate bars for an even smoother texture. Adding a tablespoon of coconut oil or vegetable oil to the melted chocolate helps it stay fluid and creates a nice, thin coating.
Buster Bar Ice Cream Dessert
A delicious no-bake ice cream dessert inspired by the classic Buster Bar treat, featuring layers of crushed Oreos, ice cream, and a chocolate-peanut coating.
Ingredients
-
1 14.3 oz pkg. of Oreo cookies, crushed
-
1/2 C butter, melted
-
1/2 gal. vanilla ice cream, softened
-
1 lb. Spanish peanuts
-
2 C powdered confectioner’s sugar
-
12 oz semi sweet chocolate chips
-
1/2 C butter
-
12 oz evaporated milk
Instructions
-
Step 1
Combine the crushed Oreo cookies and 1/2 cup melted butter. Press this mixture into the bottom of a 9×13 inch baking dish to form the crust. -
Step 2
Spread the softened vanilla ice cream evenly over the Oreo crust. -
Step 3
In a bowl, mix together the Spanish peanuts, powdered confectioner’s sugar, 1/2 cup butter, and 12 oz evaporated milk until well combined. This will form the topping. -
Step 4
Melt the semi-sweet chocolate chips gently. -
Step 5
Pour the melted chocolate over the ice cream layer, then immediately spoon the peanut topping mixture over the chocolate, spreading it as evenly as possible. -
Step 6
Freeze the dessert for at least 4 hours, or until firm. Cut into bars and serve immediately.
Important Information
Nutrition Facts (Per Serving)
It is important to consider this information as approximate and not to use it as definitive health advice.
Allergy Information
Please check ingredients for potential allergens and consult a health professional if in doubt.