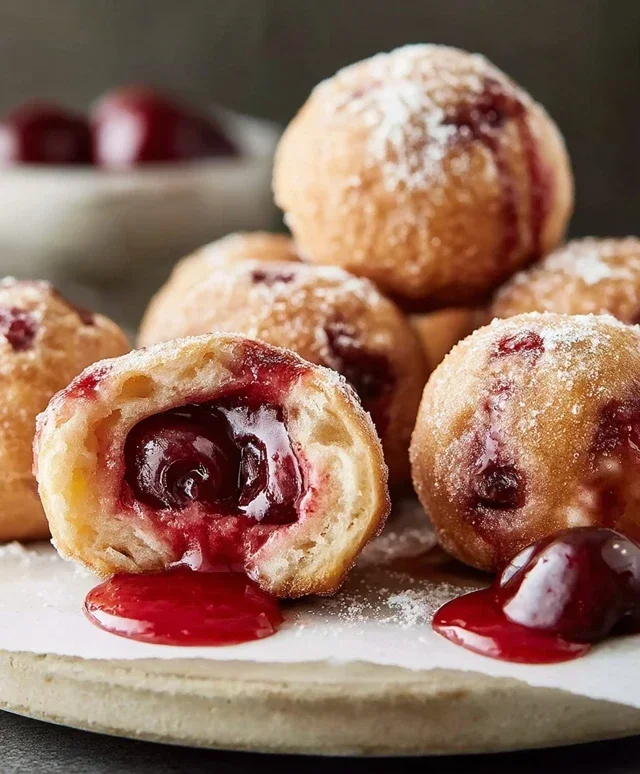
Cherry Pie Bombs-Irresistible Sweet Bites
Cherry Pie Bombs are here to revolutionize your dessert game! Forget everything you thought you knew about pie; these delightful little morsels pack all the classic, comforting flavors of a traditional cherry pie into an impossibly cute and incredibly shareable package. We all adore cherry pie for its sweet and tart filling nestled in a flaky, buttery crust, and the nostalgia it evokes. But let’s be honest, sometimes a whole pie feels like a commitment. That’s where our Cherry Pie Bombs shine. They’re the perfect way to satisfy that craving for a taste of summer without all the fuss. What makes them truly special is their portable perfection – ideal for parties, potlucks, or just a treat for yourself that feels extra indulgent. Get ready to be blown away by the pure joy these mini marvels bring!
Cherry Pie Bombs
Get ready to experience a burst of sweet, tangy cherry goodness wrapped in a flaky, golden crust! These Cherry Pie Bombs are an absolute delight, perfect for a special treat, a fun dessert to make with the family, or even a unique addition to your next potluck. Imagin extracte biting into a warm, slightly crispy exterior that gives way to a luscious, sweet-tart cherry filling. They’re like miniature hand pies, but with an extra touch of magic and an incredibly satisfying texture. The best part? They’re surprisingly simple to make, especially with a little help from some kitchen shortcuts. We’re going to take everyday ingredients and transform them into something truly spectacular. So, gather your ingredients, put on your apron, and let’s dive into creating these irresistible Cherry Pie Bombs!
Ingredients:
Making the Cherry Pie Filling
Before we begin extract assembling our bombs, it’s essential to have our cherry pie filling ready. The canned variety is a fantastic shortcut and works wonderfully here. If you find your cherry pie filling to be a bit too thin, you can easily thicken it. Gently warm it in a small saucepan over medium-low heat, stirring occasionally. If it’s still too runny, you can mix about 1 teaspoon of cornstarch with 1 tablespoon of cold water to create a slurry, then stir this into the warming filling until it thickens slightly. Be careful not to overcook it, as we want a luscious, spoonable consistency, not a solid paste. Allow the filling to cool completely before proceeding. This step is crucial; using hot filling will make the biscuit dough difficult to handle and can result in a less appealing final product.
Assembling the Cherry Pie Bombs
This is where the fun really begin extracts! You’ll start by unrolling your can of Grands “Big” biscuits. Since we’re aiming for “bomb” size, we want to create a good amount of dough to encase the cherry filling. Gently separate the biscuits. For each bomb, you’ll want to flatten out a biscuit. You can do this by hand, pressing it into a disc, or if you want a more uniform size and shape, you can carefully roll it out with a rolling pin. Aim for a circle or a slightly irregular shape that’s about 4-5 inches in diameter. The key is to make it thin enough to wrap around the filling but not so thin that it tears easily.
Next, spoon a generous amount of your cooled cherry pie filling onto the center of each flattened biscuit. Don’t overfill, as this can make sealing difficult and lead to leaks during frying. A couple of tablespoons should be just right. Now, it’s time to form the bomb! Carefully bring the edges of the biscuit dough up and around the filling, pinching and sealing them together securely at the top. Think of it like making a small, round dumpling or a tiny stuffed bun. Make sure there are no gaps or openings where the filling can escape. If any dough feels a little dry or isn’t sticking, you can lightly dampen the edges with a tiny bit of water to help them seal. You want a nice, compact ball with all the seams tightly pinched.
Frying to Golden Perfection
Now for the part that creates that irresistible crispy exterior. You’ll need a deep pot or Dutch oven for frying. Pour enough vegetable oil into the pot to come up about 2-3 inches. Heat the oil over medium heat to about 350°F (175°C). It’s important to maintain this temperature; too hot and the outside will burn before the inside is cooked, too cool and they will absorb too much oil and become greasy. You can test the oil temperature by dropping a tiny piece of biscuit dough into it – it should sizzle and float to the surface.
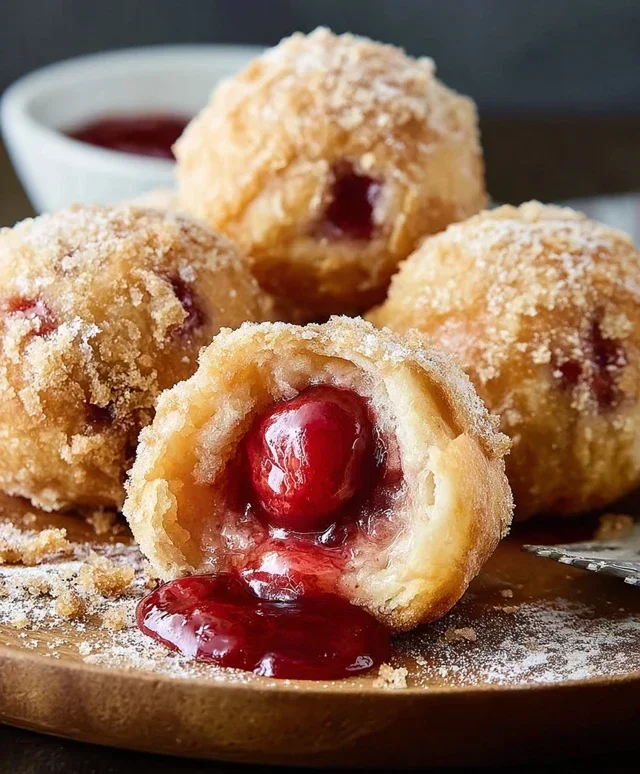
Carefully, and in batches, gently lower your assembled Cherry Pie Bombs into the hot oil. Don’t overcrowd the pot, as this will lower the oil temperature and lead to uneven cooking. Fry the bombs for about 3-5 minutes per side, or until they are a beautiful golden brown. Use a slotted spoon or spider strainer to carefully turn them over, ensuring they cook evenly on all sides. Once they’re a gorgeous golden hue, remove them from the oil and place them on a wire rack set over a baking sheet or a plate lined with paper towels. This allows excess oil to drain away, keeping your bombs perfectly crisp.
Whipping Up the Glaze
While your Cherry Pie Bombs are cooling slightly, it’s time to prepare the sweet glaze that will take them to the next level. In a medium bowl, combine the powdered sugar, milk, and light corn syrup. Whisk these ingredients together until you have a smooth, drizzle-able glaze. If the glaze seems too thick, add a tiny bit more milk, a teaspoon at a time, until you reach your desired consistency. If it’s too thin, add a little more powdered sugar. The corn syrup adds a wonderful sheen and helps prevent the glaze from hardening too quickly.
Once your Cherry Pie Bombs have cooled for a few minutes (you don’t want them piping hot, but just warm enough that the glaze will adhere nicely), you can begin extract drizzling. Use a spoon or a piping bag with a fine tip to generously drizzle the glaze over the warm bombs. Let the glaze set for a few minutes before serving. The warmth of the bombs will help the glaze melt just slightly into the flaky crust, creating a delightful contrast in textures and flavors. Enjoy these warm, gooey, and utterly delicious Cherry Pie Bombs! They’re truly a little taste of heaven.
Conclusion:
And there you have it – your guide to creating these delightful Cherry Pie Bombs! I truly hope you’ve enjoyed learning how to make these little bursts of joy. They are absolutely fantastic because they capture all the classic, comforting flavors of a traditional cherry pie but in an incredibly convenient and fun bite-sized format. The flaky pastry, the sweet and tangy cherry filling, and that hint of warmth from the spices all come together in perfect harmony. They are incredibly versatile, making them a perfect treat for any occasion.
When it comes to serving, these cherry pie bombs are wonderful on their own, of course. But imagin extracte them warm, dusted with a little powdered sugar, served alongside a scoop of vanilla bean ice cream or a dollop of whipped cream. They also make a stunning addition to any dessert platter or potluck. For variations, feel free to experiment with different types of cherries, like tart cherries for a more intense flavor, or even add a touch of almond extract to the filling. You could also try a sprinkle of cinnamon sugar on top before baking for an extra crunch and flavor boost.
I strongly encourage you to give these Cherry Pie Bombs a try. They are surprisingly simple to make, and the rewards are immense. Get ready to impress your friends and family, or simply treat yourself to a moment of pure dessert bliss. Happy baking!
Frequently Asked Questions:
Can I use canned cherries instead of fresh ones?
Absolutely! If fresh cherries are out of season or you’re looking for a quicker option, canned pitted cherries (like tart or sweet cherries) work wonderfully. Just make sure to drain them very well to prevent a soggy filling.
How should I store leftover Cherry Pie Bombs?
Once cooled, store any leftover cherry pie bombs in an airtight container at room temperature for up to 2 days, or in the refrigerator for up to 4 days. Reheat them gently in a toaster oven or microwave for that fresh-baked taste.
Can I make the dough for the cherry pie bombs ahead of time?
Yes, you can! The dough can be made a day in advance and stored, wrapped tightly, in the refrigerator. Allow it to soften slightly at room temperature for about 15-20 minutes before rolling it out.
Cherry Pie Bombs
A fun and easy dessert that transforms canned biscuits and cherry pie filling into irresistible fried sweet treats.
Ingredients
-
Vegetable oil, for frying
-
16.3 ounces Grands “Big” biscuits, flaky
-
21 ounces cherry pie filling
-
2 cups powdered sugar
-
1/4 cup milk
-
1 tablespoon light corn syrup
Instructions
-
Step 1
Open the Grands biscuits and separate them. Flatten each biscuit slightly and cut a small hole in the center of each with your finger or a small knife. -
Step 2
Carefully spoon about 1 to 2 tablespoons of cherry pie filling into the center of each biscuit, ensuring the filling is contained within the edges. -
Step 3
Pinch the edges of the biscuit dough together to seal the cherry filling inside, creating a ball-like shape. -
Step 4
Heat vegetable oil in a deep skillet or Dutch oven to about 350°F (175°C). Carefully place the cherry pie bombs into the hot oil, being careful not to overcrowd the pan. -
Step 5
Fry the bombs for about 2-3 minutes per side, or until golden brown and puffed up. Use a slotted spoon to remove them from the oil and place them on a paper towel-lined plate to drain. -
Step 6
While the bombs are still warm, prepare the glaze by whisking together the powdered sugar, milk, and light corn syrup until smooth. Drizzle the glaze over the cherry pie bombs.
Important Information
Nutrition Facts (Per Serving)
It is important to consider this information as approximate and not to use it as definitive health advice.
Allergy Information
Please check ingredients for potential allergens and consult a health professional if in doubt.