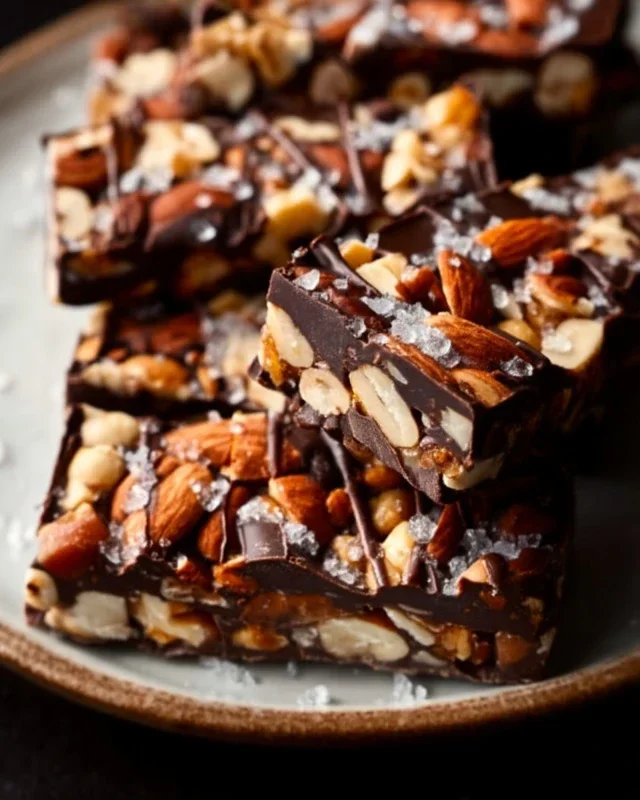
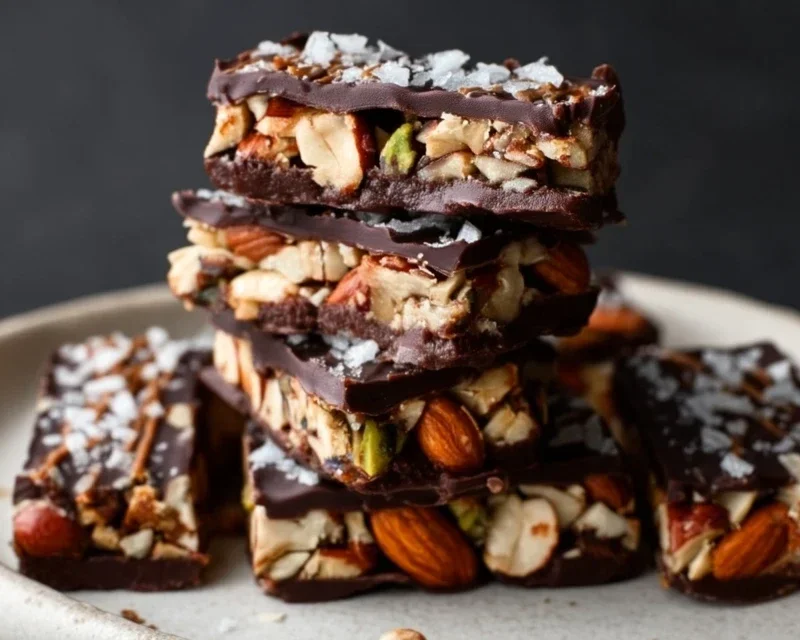
Dark Chocolate Sea Salt Nut Bars – Easy Recipe
Dark Chocolate and Sea Salt Nut Bars are more than just a treat; they are an experience. Imagin extracte this: the satisfying crunch of perfectly roasted nuts, the luxurious melt of rich, dark chocolate, all punctuated by those delightful little crystals of flaky sea salt that awaken every taste bud. It’s this perfect symphony of textures and flavors that makes these bars so utterly irresistible. We love them because they strike that incredible balance – sophisticated enough for an elegant dessert platter, yet delightfully simple and wholesome for an afternoon pick-me-up. What truly sets these Dark Chocolate and Sea Salt Nut Bars apart is the way the intense cocoa notes play against the sweet nuttiness, with the sea salt acting as the unexpected hero, cutting through the richness and leaving you craving just one more bite. They’re incredibly versatile, satisfying those sweet cravings without being overly sugary, and they always feel like a special indulgence.
Why You’ll Adore These Bars
The Perfect Blend of Sweet and Salty
These bars are a testament to the power of contrast. The deep, slightly bitter notes of high-quality dark chocolate are the perfect foil for the natural sweetness of the nuts. Then, the magic happens: a sprinkle of sea salt transforms the entire experience, elevating the individual components and creating a complex, addictive flavor profile. They’re incredibly satisfying and incredibly easy to make, meaning you can whip up a batch whenever that craving strikes.
The Ultimate Dark Chocolate and Sea Salt Nut Bars
There’s something incredibly satisfying about a homemade treat that balances rich, decadent flavors with a touch of healthy goodness. These Dark Chocolate and Sea Salt Nut Bars are precisely that. Imagin extracte a chewy, nutty base, studded with crunchy puffed rice, all bound together with a hint of sweet brown rice syrup and infused with the warmth of vanilla. Then, picture a generous drizzle of luxurious dark chocolate, its bitterness perfectly complemented by a sprinkle of flaky sea salt. It’s a symphony of textures and tastes that will have you reaching for seconds, and then thirds. Best of all, they are surprisingly simple to make, requiring no baking and minimal fuss. These bars are perfect for a post-workout snack, an afternoon pick-me-up, or even a healthier dessert option. The combination of nuts provides a good dose of healthy fats and protein, making them feel like a guilt-free indulgence.
Ingredients:
Crafting Your Nutty Masterpiece
Let’s get started on creating these delightful bars. The process is straightforward, focusing on combining the right textures and flavors for an irresistible result.
1. Prepare Your Nut Base: The foundation of these bars is, of course, the nuts. I like to use a mix for a more complex flavor and varied crunch. For this recipe, I’ve found a combination of cashews, peanuts, and almonds to be superb, but feel free to experiment with your favorites! Pecans, walnuts, or even pistachios would be delicious additions. The key is to have them unsalted so you can control the saltiness of the final bar. You’ll want to roughly chop these nuts. I prefer to leave some larger chunks for texture, but if you like a finer crum extractb, you can pulse them a bit more in a food processor. Once chopped, combine them in a large mixing bowl.
2. Introduce the Puffed Rice and Flavorings: Next, we’ll add the puffed rice to your chopped nuts. This ingredient adds a wonderful lightness and crispness that contrasts beautifully with the denser nuts. Pour the puffed rice into the bowl with the nuts. Now it’s time to bring in the binders and flavor. Add the brown rice syrup, which will act as our sticky element to hold everything together. Its mild sweetness is perfect for this application. Then, stir in the vanilla extract for that warm, aromatic depth, and the 1/2 teaspoon of sea salt to enhance all the other flavors.
3. Combine and Press into the Pan: With all your dry and wet ingredients in the bowl, it’s time to mix everything thoroughly. Use a sturdy spoon or spatula to ensure that the brown rice syrup is evenly distributed, coating the nuts and puffed rice. You want every bite to have that delightful chegrape juicess and a hint of sweetness. Once everything is well combined, take an 8×8 inch baking pan that you’ve lined with parchment paper. Make sure the parchment paper has an overhang on the sides, as this will make it incredibly easy to lift the bars out later. Spoon the nut mixture into the prepared pan. Now, using your hands (lightly greased if needed), or the bottom of a glass, firmly press the mixture down into an even layer. This step is crucial for ensuring the bars hold their shape. The firmer you press, the more cohesive your bars will be.
4. Melt and Drizzle the Dark Chocolate: While your nut mixture is setting in the pan, let’s prepare the glorious dark chocolate topping. In a heatproof bowl, combine the dark chocolate chips and the coconut oil. Coconut oil helps the chocolate melt smoothly and gives it a lovely sheen. You can melt this mixture using a double boiler method (placing the bowl over a pot of simmering water, ensuring the bottom of the bowl doesn’t touch the water) or carefully in the microwave. If microwaving, heat in 30-second intervals, stirring in between, until the chocolate is smooth and completely melted. Once melted, let the chocolate cool slightly for a minute or two so it doesn’t completely melt into the nut mixture.
5. Finish with Chocolate and Salt: Now for the grand finnon-alcoholic ale! Drizzle the melted dark chocolate evenly over the pressed nut mixture in the pan. You can use a spoon to create swirls or simply spread it out. For an extra touch of elegance and flavor, sprinkle a little flaky sea salt over the melted chocolate while it’s still wet. The contrast of the crunchy, salty flakes against the smooth chocolate and nutty base is simply divine. Once you’re happy with your topping, carefully place the pan in the refrigerator for at least 1-2 hours, or until the chocolate is completely set and the bars are firm. This chilling time is essential for allowing the bars to slice cleanly.
Once the bars are firm, use the parchment paper overhang to lift the entire slab out of the pan. Place it on a cutting board and slice into your desired bar sizes. Store any leftovers in an airtight container in the refrigerator for up to a week. Enjoy the delightful crunch, chewy texture, and the perfect harmony of dark chocolate and sea salt in every bite!
Conclusion:
There you have it – a recipe for incredibly satisfying Dark Chocolate and Sea Salt Nut Bars that’s sure to become a new favorite! These bars are a true testament to simple ingredients creating something extraordinary. The richness of the dark chocolate, the satisfying crunch of the nuts, and that delightful pop of sea salt come together in perfect harmony, offering a sophisticated yet wonderfully easy snack. They’re perfect for curbing that midday craving, a post-workout reward, or even a simple, elegant dessert.
For serving, I love these bars just as they are, perhaps with a cup of black coffee or a glass of cold milk. They also crum extractble beautifully over yogurt or ice cream for an extra textural element. Don’t be afraid to get creative with variations! Swap out the nuts for your favorites – almonds, walnuts, or pecans all work wonderfully. You could also add a sprinkle of chili flakes for a touch of heat, or some dried cranberries for a tart counterpoint. I truly encourage you to give these Dark Chocolate and Sea Salt Nut Bars a try; I’m confident you’ll love them as much as I do.
Frequently Asked Questions:
Can I make these bars vegan?
Absolutely! Simply ensure you’re using a dairy-free dark chocolate (most good quality dark chocolate is vegan, but always check the ingredients) and a vegan-friendly binder if you’re not using honey. Maple syrup or agave nectar are excellent substitutes for honey.
How should I store these nut bars?
Store your Dark Chocolate and Sea Salt Nut Bars in an airtight container at room temperature for up to a week, or in the refrigerator for up to two weeks. They firm up nicely in the fridge, making them even easier to handle.
Dark Chocolate and Sea Salt Nut Bars
Indulge in these chewy and satisfying no-bake bars, featuring a blend of nuts, puffed rice, and a rich dark chocolate coating, finished with a touch of sea salt.
Ingredients
-
2 1/2 cups unsalted nuts (3/4 cup cashews, 3/4 cup peanuts, 1 cup almonds)
-
1/2 cup puffed rice
-
1/4 cup brown rice syrup
-
1 1/2 teaspoon vanilla extract
-
1/2 teaspoon sea salt
-
1 cup dark chocolate chips
-
2 teaspoons coconut oil
-
flaky salt for topping (optional)
Instructions
-
Step 1
Line an 8×8 inch baking pan with parchment paper, leaving an overhang on the sides. -
Step 2
In a large bowl, combine the chopped nuts and puffed rice. -
Step 3
In a small saucepan over medium heat, gently warm the brown rice syrup, vanilla extract, and sea salt until combined and slightly warm. -
Step 4
Pour the warm syrup mixture over the nut and puffed rice mixture. Stir until everything is evenly coated. -
Step 5
Press the mixture firmly and evenly into the prepared baking pan. -
Step 6
In a microwave-safe bowl, melt the dark chocolate chips with the coconut oil in 30-second intervals, stirring in between, until smooth. -
Step 7
Pour the melted chocolate over the nut base and spread evenly. Sprinkle with flaky salt, if using. -
Step 8
Refrigerate for at least 1 hour, or until the chocolate is set. -
Step 9
Lift the bars out of the pan using the parchment paper overhang. Cut into desired bar shapes.
Important Information
Nutrition Facts (Per Serving)
It is important to consider this information as approximate and not to use it as definitive health advice.
Allergy Information
Please check ingredients for potential allergens and consult a health professional if in doubt.