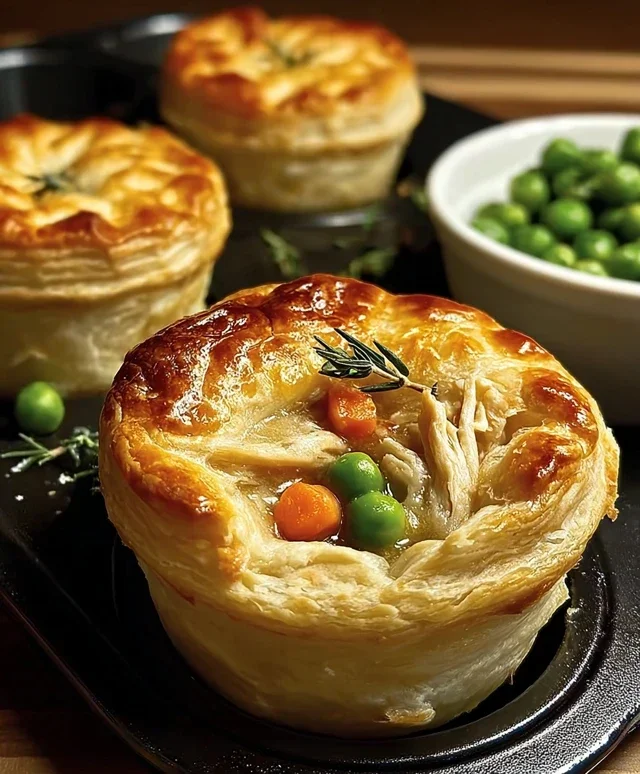
Easy Mini Chicken Pot Pies – Delicious Comfort Food
Mini chicken pot pies are the ultimate comfort food, reimagin extracted in perfectly portioned, delightful little packages. There’s something undeniably nostalgic and heartwarming about a classic chicken pot pie – that flaky, golden crust giving way to a creamy, savory filling packed with tender chicken and wholesome vegetables. But let’s be honest, sometimes a full-sized pie feels a little… much. That’s where these adorable mini chicken pot pies come in! They capture all the beloved flavors and textures of the origin extractal, but with an added charm and convenience that makes them perfect for any occasion, from weeknight dinners to impressive appetizers. We’re talking about individual servings of pure, unadulterated joy, making it easier than ever to enjoy every last spoonful of this iconic dish.
Why You’ll Love These Mini Chicken Pot Pies
A Symphony of Comfort and Convenience
Mini Chicken Pot Pies
There’s something incredibly comforting about a classic chicken pot pie. The flaky crust, the creamy, savory filling – it’s a hug in a dish. But sometimes, a full-sized pot pie can feel a bit daunting to make, or perhaps you’re just looking for a fun, individual-sized treat. That’s where these delightful Mini Chicken Pot Pies come in! They’re quick to assemble, perfect for portion control, and incredibly satisfying. They are a fantastic option for a weeknight dinner, a fun appetizer for a gathering, or even a hearty lunch. The best part? We’re going to leverage some shortcuts to make them even easier. Get ready to whip up these little pockets of pure deliciousness!
Ingredients:
Preparing Your Mini Pot Pies
Let’s get started on creating these adorable and delicious mini pot pies. The beauty of this recipe lies in its simplicity, making it accessible for cooks of all levels. We’ll be using readily available ingredients to create a flavorful and satisfying meal.
Step 1: Prepping the Chicken and Oven
First things first, let’s get our oven preheated and our chicken ready to go. Preheat your oven to 375 degrees Fahrenheit (190 degrees Celsius). While the oven is warming up, dice your ½ pound of boneless chicken breast into small, bite-sized pieces. The smaller the pieces, the faster they will cook and the more evenly they will distribute throughout your pot pies. You can also use leftover cooked chicken if you have some on hand – just shred or dice it up. This is a great way to reduce food waste and save even more time!
Step 2: Creating the Savory Filling
Now, for the heart of our mini pot pies: the filling. In a medium-sized bowl, combine the diced chicken breast with the frozen peas and carrots. This vibrant mix of vegetables adds color, texture, and nutrients to our filling. Next, pour in the entire can of cream of chicken soup. This is our creamy base, providing that classic pot pie flavor without the need for making a roux from scratch. Sprinkle in the ½ teaspoon of garlic powder, ½ teaspoon of onion powder, and ¼ teaspoon of salt. Stir everything together thoroughly until all the ingredients are well combined and the chicken and vegetables are evenly coated in the creamy soup mixture. Make sure to taste a tiny bit of the filling at this stage to adjust seasoning if needed, though the soup often provides enough saltiness on its own.
Step 3: Assembling the Pot Pie Shells
This is where the magic of refrigerated biscuits comes into play! Lightly grease a muffin tin with cooking spray. You can also use paper liners if you prefer, but a well-greased tin works perfectly. Open one can of the refrigerated biscuits. For each muffin cup, you’ll want to use two biscuit rounds. Take one biscuit round and press it gently into the bottom of a muffin cup, gently pushing it up the sides to form a base. Then, take a second biscuit round and place it on top of the first one, stretching and pressing it slightly to overlap and create a more robust crust that will cover the sides of the muffin cup. This double-layer approach helps prevent the filling from leaking out and creates a delicious, flaky bottom crust. Repeat this process for all 12 muffin cups (using one can of biscuits).
Step 4: Filling and Topping Your Mini Pies
Once your biscuit shells are in place, it’s time to fill them with our prepared chicken and vegetable mixture. Spoon the filling evenly into each of the biscuit-lined muffin cups. Don’t overfill them; leave a little space at the top as the biscuits will puff up slightly as they bake. Now, for the crowning glory: the top crust! Open the second can of refrigerated biscuits. Take one biscuit round and gently flatten it a little. Place it on top of the filling in each muffin cup, sealing the edges as best you can by pressing the top biscuit down onto the edges of the bottom biscuit crust. You want to create a senon-alcoholic aled pocket. If the biscuits feel a little sticky, you can lightly flour your hands. Ensure the top is senon-alcoholic aled to keep all that delicious filling contained.
Step 5: Baking to Golden Perfection
Now it’s time to bake these little beauties. Place the prepared muffin tin in your preheated oven. Bake for approximately 18-22 minutes, or until the biscuit topping is puffed up, golden brown, and cooked through. The filling should be bubbling around the edges. Keep an eye on them as oven temperatures can vary. You want a nice golden-brown color on the biscuit crusts, both on the top and the bottom, indicating that they are fully cooked. Once they’re done, carefully remove the muffin tin from the oven. Let them cool in the muffin tin for a few minutes before attempting to remove them. This will help them set up slightly and make them easier to handle. You can then gently loosen the edges with a knife or spatula if needed and carefully lift them out. Serve them warm and enjoy the ultimate comfort food in a perfectly portioned package!
Conclusion:
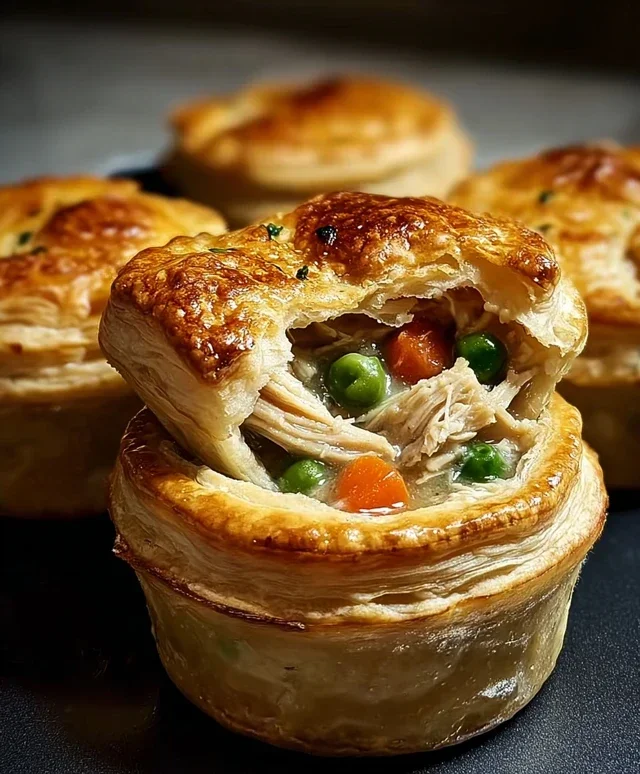
I hope you’re as excited about these mini chicken pot pies as I am! They truly are a fantastic way to enjoy all the comforting, savory goodness of a classic pot pie in a perfectly portioned, individual serving. The flaky, golden crust encasing a creamy, vegetable-rich chicken filling makes for a delightful and satisfying meal that’s perfect for any occasion, from a weeknight dinner to a special gathering. They’re wonderfully versatile and so much fun to make!
For serving suggestions, these mini chicken pot pies are delicious on their own, or you can pair them with a simple side salad dressed with a light vinaigrette to add a fresh counterpoint. If you’re feeling adventurous with variations, consider adding different vegetables like peas, corn, or even mushrooms to the filling. For a touch of spice, a pinch of cayenne pepper can liven things up. You could also experiment with different herbs like thyme or rosemary for an extra layer of flavor. Don’t be afraid to make these mini chicken pot pies your own!
I really encourage you to give this recipe a try. It’s surprisingly straightforward, and the results are incredibly rewarding. It’s a recipe that’s sure to become a favorite in your culinary repertoire.
Frequently Asked Questions:
Can I make these ahead of time?
Absolutely! You can prepare the filling and the crust dough separately and store them in the refrigerator for up to 2 days. You can also assemble the pies completely and refrigerate them before baking. When ready to bake, you might need to add a few extra minutes to the cooking time to account for the pies being chilled.
What if I don’t have individual ramekins?
No problem! You can easily adapt this recipe to make one larger, traditional chicken pot pie in a pie dish. The baking time will likely need to be adjusted; start checking for doneness around the 30-35 minute mark. You can also use muffin tins for even smaller, bite-sized portions!
Mini Chicken Pot Pies
Individual, comforting chicken pot pies made with easy-to-use biscuits.
Ingredients
-
2 cans refrigerated biscuits (8-count each)
-
½ lb boneless chicken breast, diced
-
1 cup frozen peas & carrots
-
1 can (10.5 oz) cream of chicken soup
-
½ tsp garlic powder
-
½ tsp onion powder
-
¼ tsp salt
-
Cooking spray
Instructions
-
Step 1
Preheat oven to 375°F (190°C). Lightly grease a muffin tin with cooking spray. -
Step 2
In a bowl, combine the diced chicken breast, frozen peas & carrots, cream of chicken soup, garlic powder, onion powder, and salt. Stir well to coat all ingredients. -
Step 3
Separate the refrigerated biscuits and press each biscuit into the bottom and up the sides of the muffin tin cups, forming a crust. -
Step 4
Spoon the chicken mixture evenly into each biscuit-lined muffin cup. -
Step 5
Bake for 20-25 minutes, or until the biscuits are golden brown and the filling is hot and bubbly. -
Step 6
Let cool slightly before carefully removing from the muffin tin. Serve warm.
Important Information
Nutrition Facts (Per Serving)
It is important to consider this information as approximate and not to use it as definitive health advice.
Allergy Information
Please check ingredients for potential allergens and consult a health professional if in doubt.