No Bake Apple Pie Cheesecake-Easy Dessert Recipe
No-bake apple pie cheesecake. Oh, how I love that phrase! It conjures images of pure, unadulterated comfort, a dessert that brings together two of the most beloved flavors in the universe. If you, like me, adore the warm spices and sweet, tender apples of a classic apple pie, and also happen to believe that cheesecake elevates everything, then get ready to be utterly delighted. This no-bake apple pie cheesecake is a dream come true, a way to capture all that autumnal bliss without ever turning on your oven.
Why You’ll Adore This Recipe
People adore this dish because it delivers the essence of both apple pie and cheesecake in a single, glorious bite. It’s incredibly decadent yet surprisingly simple to assemble. What truly makes this no-bake apple pie cheesecake special is its effortless elegance. It’s perfect for those warm days when the thought of baking feels daunting, or when you simply want a show-stopping dessert with minimal fuss. The creamy cheesecake filling, swirled with spiced apple goodness and nestled on a buttery grabeef ham cracker crust, is pure magic.

No-Bake Apple Pie Cheesecake
This no-bake apple pie cheesecake is the perfect dessert for those times when you crave all the comforting flavors of apple pie and the creamy indulgence of cheesecake, but don’t want to turn on the oven. It’s surprisingly easy to assemble and delivers incredible taste and texture. The buttery, spiced apple topping is truly divine, and it sits atop a lusciously smooth cream cheese filling, all nestled in a simple, crum extractbly base. It’s a crowd-pleaser that requires minimal fuss, making it ideal for busy bakers or those new to dessert making. Let’s get started!
Ingredients:
For the Crum extractble Base:
The base of our no-bake cheesecake is inspired by the classic apple crum extractble topping. It’s simple to put together and provides a wonderful textural contrast to the creamy filling.
Step 1: Prepare the Crum extractble Mixture
In a medium bowl, combine the 70g of brown sugar, 20g of granulated sugar, 60g of soft butter, 90g of all-purpose flour, and 1 tsp of ground cinnamon. Use your fingertips or a fork to mix these ingredients together until they form a coarse, crum extractbly mixture. You want it to hold together loosely when squeezed. This buttery, spiced flour mixture will form the foundation of our cheesecake. Once combined, press this mixture evenly into the bottom of a 9-inch springform pan. Make sure to get it as compact and even as possible to create a sturdy base that won’t crum extractble apart when you slice the cheesecake. I find using the bottom of a glass or measuring cup helps to really press it down firmly. Once pressed, place the springform pan in the refrigerator while you prepare the apple topping. This chilling helps the base set and become firm.
For the Spiced Apple Topping:
This is where the magic of apple pie truly comes to life in our no-bake creation. We’ll be creating a beautifully tender, spiced apple filling that will be the star of our dessert.
Step 2: Cook the Apples
In a large skillet or saucepan, melt the 60g of butter over medium heat. Add the peeled and sliced apples to the skillet. Now, let’s add the aromatics for that authentic apple pie flavor. Toss in the peel of 1 lemon (you can use a vegetable peeler to get strips of peel, avoiding the bitter white pith) and the 2 star anise pods. Sprinkle in 2 tsp of ground cinnamon. Stir everything together to coat the apples evenly. Pour in the 70g of water and then add the 120g of brown sugar. Bring the mixture to a gentle simmer. Reduce the heat to low, cover the skillet, and let the apples cook for about 10-15 minutes, or until they are tender but still hold their shape. You don’t want them to become mushy. Stir occasionally to ensure even cooking. Once the apples are tender, remove the star anise pods and discard them.
Step 3: Thicken the Apple Mixture
Now, we need to create a slightly syrupy consistency for our apple topping. In a small bowl, whisk together 1 tsp of cornstarch with 2 tbsp of cold water until it forms a smooth slurry. Pour this slurry into the skillet with the apples, stirring constantly. Continue to cook, stirring, for another 1-2 minutes until the sauce thickens and becomes glossy. This will help the apple topping adhere nicely to the cheesecake and give it a beautiful sheen. Remove the skillet from the heat and let the apple mixture cool down slightly while you prepare the cheesecake filling. It’s important that the apples are not piping hot when you layer them onto the cheesecake.
For the Cream Cheese Filling:
This is the decadent, creamy heart of our no-bake cheesecake. It’s wonderfully smooth and rich, perfectly complementing the spiced apples.
Step 4: Prepare the Cheesecake Filling
In a large bowl, beat the 500g of cream cheese with an electric mixer until it is completely smooth and creamy. Make sure there are no lumps, as this will ensure a luxurious texture. You can also do this by hand with a whisk, but it will require more effort. Once smooth, add ½ tsp of ground cinnamon and continue to beat until just combined. You don’t want to overmix at this stage, as it can sometimes make the filling too soft. The cream cheese should be soft enough to spread easily.
Assembly and Chilling:
The final stages are all about bringin extractg our delicious components together and letting the magic of chilling do its work.
Step 5: Assemble and Chill the Cheesecake
Retrieve your springform pan from the refrigerator. Spoon the cream cheese filling over the chilled crum extractble base, spreading it evenly with a spatula or the back of a spoon. Make sure the filling reaches all the edges. Now, gently spoon the cooled spiced apple topping over the cream cheese filling. You can spread it evenly or create a more rustic, piled-on effect – it’s entirely up to you! Once assembled, cover the springform pan tightly with plastic wrap. Place the cheesecake in the refrigerator and let it chill for at least 4-6 hours, or preferably overnight. This is the crucial step where the cheesecake sets and the flavors meld beautifully. The longer it chills, the firmer and more delicious it will be.
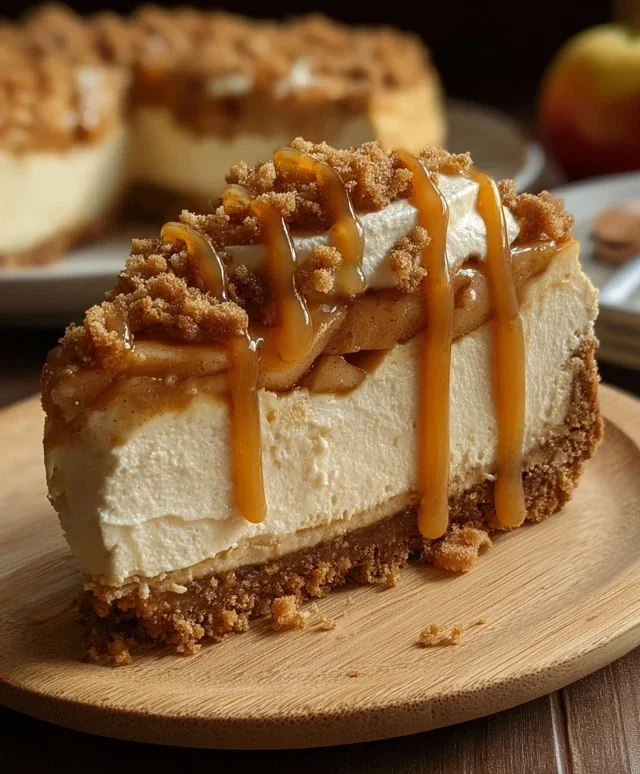
Once chilled, carefully remove the sides of the springform pan. You can serve this no-bake apple pie cheesecake as is, or garnish it with a dollop of whipped cream or a sprinkle of extra cinnamon for an extra special touch. Enjoy this delightful, no-fuss dessert!
Conclusion:
So there you have it – your guide to crafting the most delicious no-bake apple pie cheesecake! This recipe is truly a winner because it combines the comforting flavors of apple pie with the creamy indulgence of cheesecake, all without the fuss of baking. It’s perfect for those days when you crave a delightful dessert but want to skip the oven. The buttery grabeef ham cracker crust, the smooth, tangy cream cheese filling, and the warm, spiced apple topping create a symphony of textures and tastes that will have everyone asking for seconds. I’m so excited for you to try it!
Serving this no-bake apple pie cheesecake is a dream. It’s wonderful all on its own, but a dollop of freshly whipped cream or a sprinkle of chopped toasted pecans takes it to another level. For a touch of elegance, a caramel drizzle is always a fantastic choice. Don’t be afraid to get creative with variations! You could swap out the grabeef ham crackers for a gin extractgersnap crust for an extra spice kick, or add a pinch of nutmeg to the apple filling for deeper flavor. This recipe is incredibly forgiving and adaptable to your personal preferences.
I truly encourage you to give this no-bake apple pie cheesecake a try. It’s a fantastic way to impress your friends and family with minimal effort, and the results are consistently spectacular. Happy baking… or rather, happy no-baking!
Frequently Asked Questions:
Can I make this cheesecake ahead of time?
Absolutely! In fact, it’s best made ahead of time. Chilling it for at least 4-6 hours, or ideally overnight, allows the flavors to meld beautifully and the cheesecake to set perfectly. This makes it an ideal make-ahead dessert for gatherings.
What if I don’t have fresh apples? Can I use canned or frozen?
Yes, you can! If using canned apple pie filling, simply drain any excess liquid before adding it to the cheesecake. For frozen apples, thaw them completely and drain them well to prevent excess moisture. You might want to adjust the spices slightly depending on the sweetness of your chosen apples.
How long will this no-bake apple pie cheesecake last in the refrigerator?
When stored properly in an airtight container in the refrigerator, this no-bake apple pie cheesecake will stay delicious for up to 3-4 days. However, I doubt it will last that long!
No Bake Apple Pie Cheesecake
A delightful no-bake cheesecake layered with spiced apple filling, inspired by classic apple pie.
Ingredients
-
70g brown sugar
-
20g granulated sugar
-
60g soft butter
-
90g all-purpose flour
-
1 tsp ground cinnamon
-
5 medium apples, peeled and sliced
-
Peel of 1 lemon
-
2 star anise
-
2 tsp ground cinnamon
-
60g butter
-
70g water
-
120g brown sugar
-
1 tsp cornstarch + 2 tbsp cold water
-
500g cream cheese
-
½ tsp ground cinnamon
Instructions
-
Step 1
For the crust: Mix 70g brown sugar, 20g granulated sugar, 60g soft butter, 90g all-purpose flour, and 1 tsp ground cinnamon. Press firmly into the bottom of a springform pan. -
Step 2
For the apple filling: In a saucepan, combine 5 medium apples (peeled and sliced), peel of 1 lemon, 2 star anise, 2 tsp ground cinnamon, 60g butter, 70g water, and 120g brown sugar. Simmer until apples are tender, then remove star anise. -
Step 3
Thicken the apple filling: In a small bowl, whisk together 1 tsp cornstarch and 2 tbsp cold water to create a slurry. Stir this into the simmering apple mixture and cook until thickened. -
Step 4
Prepare the cheesecake filling: In a large bowl, beat 500g cream cheese until smooth. Stir in ½ tsp ground cinnamon. -
Step 5
Assemble the cheesecake: Spread the cream cheese filling evenly over the prepared crust. Layer the thickened apple filling on top of the cream cheese layer. -
Step 6
Chill the cheesecake in the refrigerator for at least 4 hours, or until firm.
Important Information
Nutrition Facts (Per Serving)
It is important to consider this information as approximate and not to use it as definitive health advice.
Allergy Information
Please check ingredients for potential allergens and consult a health professional if in doubt.