Pineapple Upside-Down Pancake Recipe- Sweet Tropical Breakfast
Pineapple upside-down pancakes are a delightful twist on a classic breakfast that I can’t get enough of. Imagin extracte this: warm, fluffy pancakes crowned with caramelized pineapple rings and a rich, buttery brown sugar glaze. It’s the perfect sweet and tangy combination that instantly transports you to a tropical paradise, even if you’re just in your kitchen on a Tuesday morning. What’s not to love about this vibrant dish? It’s incredibly appealing because it takes the comfort of familiar pancakes and elevates them with an explosion of flavor and texture. The magic of pineapple upside-down pancakes lies in that glorious moment when you flip them, revealing the glistening, golden pineapple at the bottom of your pan. It’s a showstopper that’s surprisingly simple to make, and guaranteed to bring smiles to everyone at your breakfast table.
Pineapple Upside-Down Pancakes
There’s something undeniably joyous about a Pineapple Upside-Down Cake. The caramelized pineapple rings, the rich, buttery topping, the tender cake – it’s a classic for a reason. But what if you could capture all that deliciousness in a breakfast-friendly, weeknight-quick format? Enter: Pineapple Upside-Down Pancakes! These aren’t just regular pancakes with a pineapple ring dropped on top. We’re talking about creating that signature upside-down magic right in your pancake pan, transforming your morning meal into a delightful treat. Get ready for a burst of tropical sweetness and a satisfyingly fluffy pancake that’s a far cry from your everyday breakfast.
Ingredients:
Cooking Instructions:
This recipe is all about building those beautiful caramelized layers before the pancake batter even hits the pan. It’s a simple process that yields spectacular results.
Creating the Pineapple Topping
1. Prepare the Pan: We’re going to start by making the upside-down topping directly in the pan you’ll be cooking your pancakes in. A good quality non-stick skillet or a well-seasoned cast iron pan works best for this. Place your skillet over medium-low heat. Add the 3 tablespoons of butter to the pan. Let it melt completely, swirling it around to coat the bottom of the pan evenly. We want a nice, even layer of melted butter to prevent sticking and to help create that gorgeous caramelization.
2. Caramelize the Pineapple: Once the butter is melted and shimmering, carefully arrange your 4 pineapple rings in a single layer at the bottom of the skillet. If you’re using canned pineapple, make sure to drain them well before placing them in the pan. Next, evenly sprinkle the 1/4 cup of brown sugar over the pineapple rings. The brown sugar will melt and combine with the butter to create a rich, syrupy caramel. Allow this mixture to cook gently for about 3-5 minutes, or until the brown sugar has mostly dissolved and is starting to bubble and caramelize. Keep an eye on it so it doesn’t burn. This step is crucial for developing that signature sweet and slightly tangy flavor.
3. Add the Cherries: While the pineapple and brown sugar are caramelizing, take your 4 maraschino cherries and place one in the center of each pineapple ring. The cherries add a lovely pop of color and a sweet, slightly tart counterpoint to the pineapple. Don’t worry if they sink a little into the caramel mixture; that’s perfectly normal. Let the topping continue to cook for another minute or two, just until the cherries are warmed through and nestled into the syrupy pineapple.
Making the Pancake Batter
4. Combine Dry Ingredients: In a medium-sized mixing bowl, whisk together the 1 cup of all-purpose flour, 1 tablespoon of sugar, 1 teaspoon of baking powder, 1/2 teaspoon of baking soda, and 1/4 teaspoon of salt. Whisking these ingredients together ensures that the leavening agents (baking powder and baking soda) and salt are evenly distributed throughout the flour, which will result in uniformly fluffy pancakes. This also helps to aerate the dry ingredients, making for a lighter batter.
5. Combine Wet Ingredients: In a separate, smaller bowl, whisk together the 3/4 cup of buttermilk, 1 large egg, and 2 tablespoons of melted butter. The buttermilk is key to tender, moist pancakes, as its acidity reacts with the baking soda to create a lovely rise and a soft texture. The melted butter adds richness and helps bind the batter.
6. Combine Wet and Dry: Pour the wet ingredients into the bowl with the dry ingredients. Now, here’s a pro-tip for perfect pancakes: mix until just combined. A few lumps in your batter are perfectly fine, even desirable! Overmixing develops the gluten in the flour, which can lead to tough, rubbery pancakes. Gently fold the ingredients together with a spatula or whisk until you no longer see large streaks of dry flour. A few minutes of resting the batter (about 5-10 minutes) can also help relax the gluten and make for even more tender pancakes.
Assembling and Cooking the Pancakes
7. Pour the Batter: Carefully and evenly pour your pancake batter over the caramelized pineapple and cherry topping in the skillet. You’ll want to divide the batter so that you have one pancake per pineapple ring. Try to pour it directly onto the pineapple, letting it spread outwards naturally. If your pan is large enough, you might be able to make all four at once. If not, you may need to do this in batches, carefully removing the pineapple topping and wiping the pan clean before repeating the process for the next batch of pancakes.
8. Cook to Perfection: Cook the pancakes over medium-low heat for about 3-5 minutes per side, or until you see bubbles forming on the surface and the edges look set. The bottom should be a beautiful golden brown. When you’re ready to flip, use a thin, flexible spatula to carefully get underneath the entire pancake, including the pineapple and cherry. Gently but confidently flip the pancake. Cook the second side for another 2-3 minutes until golden brown and cooked through. The heat from the pan will continue to gently cook and caramelize the pineapple and brown sugar even after flipping, creating a delightful sticky-sweet glaze on top of your finished pancake.
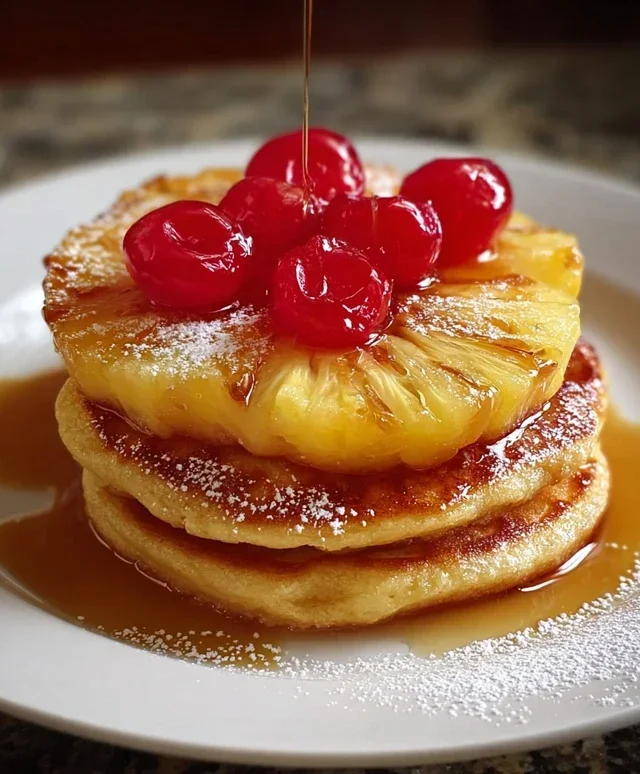
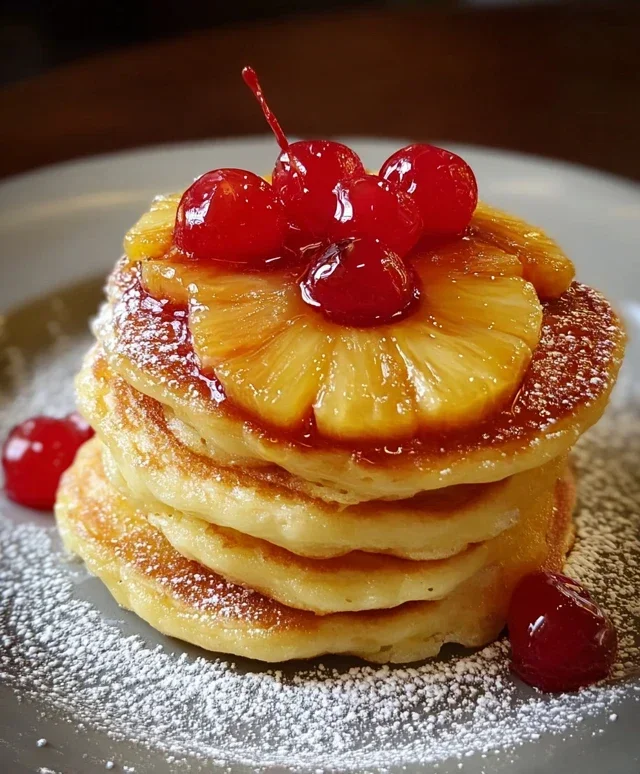
9. Serve Immediately: Once your Pineapple Upside-Down Pancakes are cooked to golden perfection, gently slide them from the pan onto your plates. The caramelized pineapple and sticky glaze should now be on top, just like their cakey counterparts. Serve them immediately while they’re warm and the topping is gooey. These are absolutely delightful on their own, but a dollop of whipped cream or a drizzle of extra maple syrup can be a wonderful addition if you’re feeling extra indulgent. Enjoy this sunny, tropical twist on a breakfast favorite!
Conclusion:
So there you have it – your guide to creating these absolutely delightful Pineapple Upside-Down Pancakes! I truly believe this recipe is a winner because it takes a beloved classic and gives it a fun, breakfast-friendly twist. The caramelized pineapple rings create a beautiful, sweet, and tangy topping that pairs perfectly with the fluffy pancake base. It’s a breakfast that feels special enough for a weekend brunch but is simple enough to whip up on a slightly more relaxed weekday morning. Don’t hesitate to try this recipe; I promise you won’t be disappointed!
For serving, I love these just as they are, but a dollop of whipped cream or a drizzle of extra syrup takes them to another level. You could also sprinkle on some toasted coconut for an extra tropical flair. If you’re feeling adventurous with variations, consider adding a pinch of cinnamon or a touch of rum extract extract to the pancake batter for a more complex flavor profile. You could even experiment with different fruits like peaches or mangoes, though the classic pineapple is hard to beat!
Frequently Asked Questions:
Q: Can I make the pineapple topping ahead of time?
A: Absolutely! You can prepare the caramelized pineapple mixture a day in advance. Store it in an airtight container in the refrigerator. When you’re ready to make your pancakes, simply warm the pineapple mixture gently before spooning it into your pan.
Q: My pancakes are sticking to the pan. What am I doing wrong?
A: Ensure your pan is adequately heated and greased. A medium heat is usually best for pancakes to cook through without burning. Also, make sure you’ve given the pancake enough time to set before attempting to flip it. If you’re using a non-stick pan, that can significantly help prevent sticking.
Q: What kind of pineapple works best for this recipe?
A: Canned pineapple rings packed in juice or light syrup are ideal for this recipe. They are already sliced and tend to caramelize beautifully. If you use fresh pineapple, make sure to slice it uniformly and expect a slightly different caramelization process.
Pineapple Upside-Down Pancakes
A delightful twist on classic pancakes, featuring caramelized pineapple and maraschino cherries baked right into the batter.
Ingredients
-
4 pineapple rings (canned or fresh)
-
4 maraschino cherries
-
3 tablespoons butter
-
1/4 cup brown sugar
-
1 cup all-purpose flour
-
1 tablespoon sugar
-
1 teaspoon baking powder
-
1/2 teaspoon baking soda
-
1/4 teaspoon salt
-
3/4 cup buttermilk
-
1 large egg
-
2 tablespoons butter, melted
Instructions
-
Step 1
Preheat oven to 375°F (190°C). Melt 3 tablespoons of butter in an oven-safe skillet or individual ramekins. Sprinkle brown sugar evenly over the melted butter. -
Step 2
Place one pineapple ring on top of the brown sugar mixture in the skillet or in each ramekin. Add a maraschino cherry in the center of each pineapple ring. -
Step 3
In a large bowl, whisk together the all-purpose flour, 1 tablespoon sugar, baking powder, baking soda, and salt. -
Step 4
In a separate bowl, whisk together the buttermilk, large egg, and 2 tablespoons of melted butter. -
Step 5
Pour the wet ingredients into the dry ingredients and stir until just combined. Do not overmix; a few lumps are okay. -
Step 6
Carefully pour the pancake batter over the pineapple and cherry mixture in the skillet or ramekins. -
Step 7
Bake for 18-20 minutes, or until a toothpick inserted into the center comes out clean. -
Step 8
Let cool for a few minutes, then carefully invert the skillet or ramekins onto serving plates. Serve warm.
Important Information
Nutrition Facts (Per Serving)
It is important to consider this information as approximate and not to use it as definitive health advice.
Allergy Information
Please check ingredients for potential allergens and consult a health professional if in doubt.