Sticky Coconut Cake- Moist & Delicious Recipe
Sticky Coconut Cake is more than just a dessert; it’s a warm hug in cake form, a tropical escape you can bake right in your own kitchen. There’s something utterly irresistible about the combination of tender, moist cake infused with fragrant coconut, all enveloped in a luscious, gooey glaze that truly lives up to the ‘sticky’ in its name. We love it because it’s deceptively simple to make, yet delivers such a decadent, satisfying experience. Forget fussy techniques; this Sticky Coconut Cake is all about pure, unadulterated comfort and deliciousness. Its unique charm lies in its texture – the delicate crum extractb of the cake against the yielding sweetness of the topping. It’s the perfect treat for a cozy afternoon, a special celebration, or simply when you need a little sunshine on a plate. Get ready to discover your new favorite way to enjoy coconut!
Sticky Coconut Cake
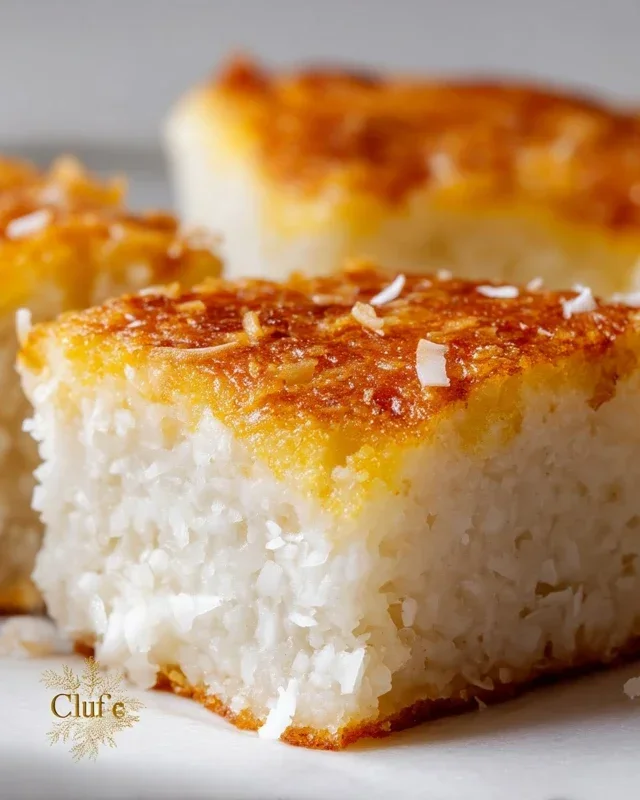
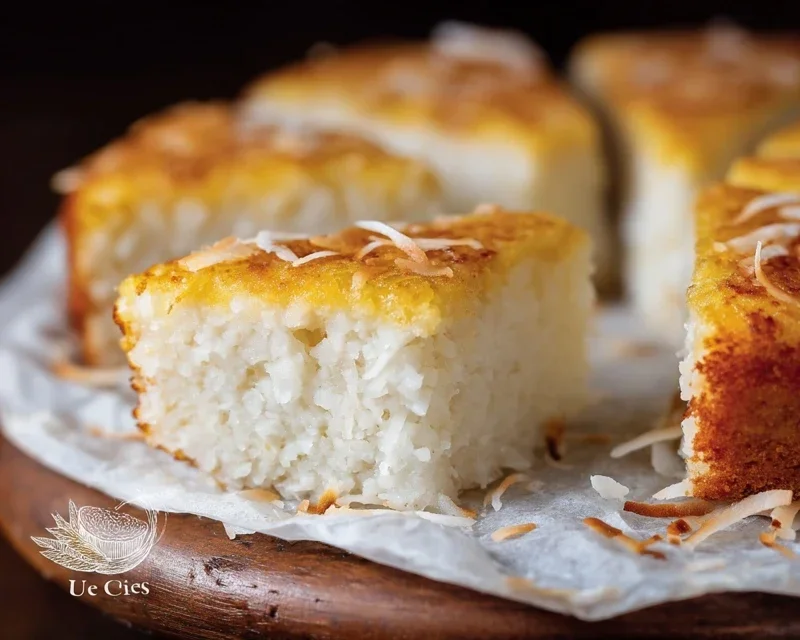
There’s something incredibly comforting about a slice of warm, fragrant, and wonderfully chewy cake. And when that cake is infused with the tropical sweetness of coconut and has a delightful sticky texture, well, that’s just pure bliss. My Sticky Coconut Cake is a recipe that’s close to my heart, a delightful bake that transports me to sunnier climes with every bite. It’s surprisingly simple to make, relying on just a few key ingredients to create a dessert that’s both rustic and refined. The magic happens as the glutinous rice flour, coconut milk, and shredded coconut meld together, creating that signature sticky, almost chewy, texture that makes this cake so irresistible.
This isn’t your light and airy sponge. Instead, expect a dense, moist, and utterly satisfying cake with a deep coconut flavour. It’s perfect for an afternoon tea, a simple dessert after dinner, or even as a treat with your morning coffee. The subtle sweetness from the sugar is beautifully balanced by the richness of the coconut milk and the subtle chew from the shredded coconut.
Ingredients:
Instructions:
First things first, let’s get our oven preheated to 350°F (175°C) and prepare our baking pan. I like to use an 8×8 inch square baking pan. To ensure our cake doesn’t stick and comes out beautifully, generously grease the pan with butter or cooking spray. For an extra layer of insurance and a little more coconut flavour, I often dust the greased pan with a tablespoon or two of the shredded sweetened coconut. This creates a lovely subtle crust and prevents any sticking. Set this prepared pan aside while we move on to mixing our batter.
In a large mixing bowl, let’s start with the wet ingredients. We’ll begin extract by creaming together the egg yolks and the granulated sugar. Using an electric mixer or a sturdy whisk, beat the egg yolks and sugar until the mixture becomes pnon-alcoholic ale yellow and noticeably thicker. This process, called creaming, incorporates air into the mixture, which will contribute to the cake’s texture. Don’t rush this step; it’s worth the effort. Next, add the full fat canned coconut milk and the vanilla extract to this bowl. Whisk everything together until it’s well combined and smooth. The aroma of vanilla and coconut starting to mingle is already a good sign!
Now, let’s introduce the dry ingredients. To the wet mixture, we’ll gradually add the glutinous rice flour and the shredded sweetened coconut. It’s important to add these in stages, mixing thoroughly after each addition. Start by adding about a third of the glutinous rice flour and half of the shredded coconut. Mix until just combined. Then, add another third of the flour and the remaining shredded coconut, mixing again. Finally, add the last of the glutinous rice flour. Continue to mix until you have a thick, cohesive batter. Be careful not to overmix at this stage; we want to avoid developing the gluten in the rice flour too much, which could make the cake tough. The batter will be quite dense and sticky, which is exactly what we’re looking for.
In a separate, clean bowl, we’re going to whip the egg whites. This is where we add a little extra lift to our cake. Using clean beaters or a whisk, beat the egg whites until they form stiff peaks. This means that when you lift the beaters or whisk, the egg whites stand up straight and don’t flop over. This is crucial for creating a lighter texture within the dense batter. Once you have stiff peaks, gently fold about a third of the whipped egg whites into the thick coconut batter. Use a spatula and a gentle folding motion, cutting down through the center of the batter and bringin extractg it up and over the egg whites. The goal here is to lighten the batter without deflating the egg whites. Once that’s incorporated, gently fold in the remaining whipped egg whites until no streaks of white remain, but be careful not to overmix. This step requires patience and a delicate hand.
Now it’s time to bake! Pour the batter evenly into your prepared baking pan. Smooth the top with your spatula. Place the pan in the preheated oven and bake for approximately 40 to 50 minutes. The cake is done when a toothpick inserted into the center comes out clean, or with just a few moist crum extractbs attached (remember, it’s a sticky cake, so completely dry might mean it’s overbaked). The top should be golden brown and the edges should be pulling away slightly from the sides of the pan. The aroma filling your kitchen will be heavenly. Once baked, remove the cake from the oven and let it cool in the pan on a wire rack for at least 20-30 minutes. This cooling period is essential for the cake to set properly and for the sticky texture to fully develop. You can serve it warm or at room temperature. I love to serve it with a dollop of whipped cream or a sprinkle of extra toasted coconut. Enjoy this delightful taste of the tropics!
Conclusion:
I hope you’ve enjoyed diving into this recipe for Sticky Coconut Cake! This cake is truly a triumph – its irresistible moist crum extractb, infused with the tropical sweetness of coconut, is perfectly complemented by a luscious, golden sticky glaze. It’s the kind of dessert that brings a smile to everyone’s face, whether you’re a seasoned baker or just starting out. The simplicity of the ingredients belies the sophisticated flavour and texture, making it an absolute winner for any occasion.
This Sticky Coconut Cake is wonderfully versatile. Serve it warm, straight from the oven, with a dollop of whipped cream or a scoop of vanilla bean ice cream for ultimate indulgence. It also makes a fantastic afternoon tea treat, or a delightful ending to a special meal. For a little extra flair, consider garnishing with toasted coconut flakes or fresh tropical fruit like mango or pineapple. If you’re feeling adventurous, why not add a hint of lime zest to the batter for a brighter citrus note, or even a sprinkle of cinnamon for warmth?
I genuinely encourage you to give this recipe a try. It’s a joy to bake and even more of a joy to share. I’m confident you’ll fall in love with its comforting texture and delightful flavour just as much as I have.
Frequently Asked Questions:
Can I make this cake ahead of time?
Absolutely! This Sticky Coconut Cake is even better the next day as the flavours have more time to meld. Once cooled, you can store it in an airtight container at room temperature for up to 3 days. The glaze will firm up slightly but will still be delicious.
What kind of coconut should I use?
For this recipe, using desiccated or shredded coconut will yield the best results. Sweetened or unsweetened can work, but if you use sweetened, you might want to slightly reduce the sugar in the cake batter. The sticky glaze relies on the natural oils and texture of the coconut.
Sticky Coconut Cake
A delightful and moist sticky cake made with coconut milk and shredded coconut.
Ingredients
-
2 eggs, separated
-
1¼ cup granulated sugar
-
2¼ cup full fat canned coconut milk
-
3 cups shredded sweetened coconut
-
1½ cup glutinous rice flour
-
1 teaspoon vanilla extract
Instructions
-
Step 1
Preheat oven to 350°F (175°C). Grease and flour a 9×13 inch baking pan. -
Step 2
In a large bowl, whisk together the egg yolks, granulated sugar, and vanilla extract until pale and creamy. -
Step 3
Gradually whisk in the coconut milk until well combined. -
Step 4
Add the shredded coconut and glutinous rice flour to the wet ingredients. Mix until just combined, being careful not to overmix. -
Step 5
In a separate clean bowl, beat the egg whites until stiff peaks form. -
Step 6
Gently fold the beaten egg whites into the coconut mixture until no streaks remain. -
Step 7
Pour the batter into the prepared baking pan and spread evenly. -
Step 8
Bake for 40-50 minutes, or until a toothpick inserted into the center comes out clean.
Important Information
Nutrition Facts (Per Serving)
It is important to consider this information as approximate and not to use it as definitive health advice.
Allergy Information
Please check ingredients for potential allergens and consult a health professional if in doubt.