Cheesy Zucchini Breadsticks-Easy Delicious Recipe
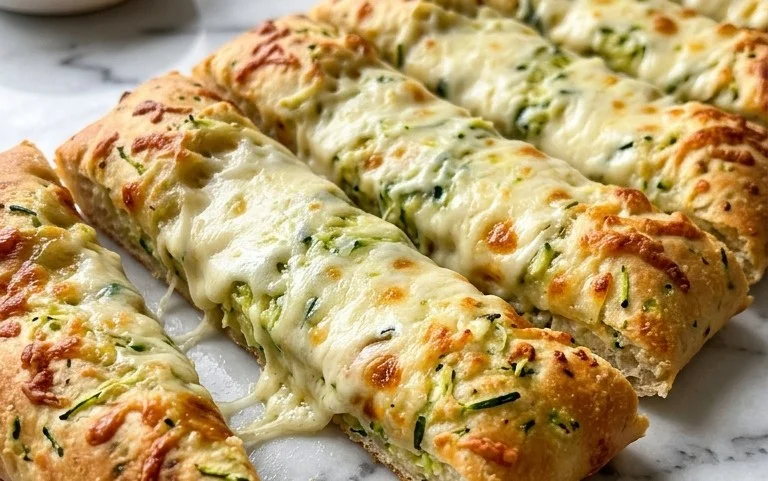
Cheesy Zucchini Breadsticks are about to become your new favorite snack, appetizer, or even a side dish! If you’re anything like me, you’re always on the hunt for that perfect balance of savory and satisfying, and these breadsticks deliver in spades. They take the humble zucchini, often relegated to summer salads, and transform it into something utterly irresistible. What’s not to love about warm, chewy bread studded with tender zucchini and generously coated in melty, golden cheese? They’re surprisingly easy to make, proving that healthy-ish ingredients can indeed create pure indulgence. The subtle earthiness of the zucchini pairs beautifully with the sharp tang of the cheese, creating a flavor profile that’s both comforting and exciting. Get ready to impress your friends and family (or just treat yourself!) with these delightful cheesy zucchini breadsticks.
Cheesy Zucchini Breadsticks
Looking for a delicious and surprisingly healthy way to use up that garden bounty of zucchini? Or maybe you just love the idea of a savory, cheesy snack that’s a step up from plain old breadsticks? Well, you’ve come to the right place! These Cheesy Zucchini Breadsticks are a game-changer. They’re incredibly easy to make, packed with flavor, and boast a wonderful texture that’s both tender and slightly crisp. My family devours these, and the best part? They barely realize they’re eating a vegetable! They’re perfect as an appetizer, a side dish for pasta or soup, or even a light lunch. Let’s get started!
Ingredients:
Preparation Steps
Step 1: Prepare the Zucchini
The first and most crucial step for making fantastic zucchini breadsticks is properly preparing the zucchini. We need to get as much moisture out as possible to avoid soggy breadsticks. Start by washing your zucchini thoroughly. Then, use a box grater or a food processor with a grating attachment to grate the zucchini. You’re looking for about 4 cups of grated zucchini. Once grated, place the zucchini in a fine-mesh sieve set over a bowl. Now comes the pressing part. Use the back of a spoon or your hands to firmly press down on the grated zucchini, squeezing out as much liquid as you possibly can. Don’t be shy here; the more water you remove, the better your breadsticks will turn out. You might be surprised by how much liquid comes out! You can discard the liquid or save it for another use, like adding to smoothies or soups, though it’s usually quite watery. Once you’ve squeezed it dry, transfer the squeezed zucchini to a large mixing bowl.
Step 2: Combine the Wet and Dry Ingredients
Now that our zucchini is prepped, it’s time to bring everything else together. To the bowl with the squeezed zucchini, add the 1 large egg. The egg acts as a binder, helping to hold all the ingredients together. Next, add the ½ cup of shredded mozzarella cheese and the ⅓ cup of finely shredded Parmesan cheese. These cheeses are key to that irresistible savory, cheesy flavor and contribute to the delightful texture. For seasoning, we’ll add 1 teaspoon of dried Italian seasoning, which provides a wonderful herbaceous aroma and taste. Then, add ½ teaspoon of salt to enhance all the flavors, and ½ teaspoon of garlic powder for a subtle but essential garlic kick. Mix everything together thoroughly with a spoon or spatula until all the ingredients are well combined and evenly distributed throughout the zucchini mixture. Make sure there are no dry pockets of seasoning or cheese.
Step 3: Add the Final Cheese and Form the Breadsticks
This is where we add the secret weapon for ultimate cheesiness! To the mixture you just combined, add the remaining 1 cup of finely shredded mozzarella cheese. This extra cheese will create gooey pockets and a beautiful golden-brown crust when baked. Gently fold this additional mozzarella into the zucchini mixture. You want to distribute it, but don’t overmix. Now, we need to shape our breadsticks. Lightly grease a baking sheet or line it with parchment paper. This will prevent sticking and make for easier cleanup. Using your hands, take portions of the mixture and roll them into log shapes, about 6-7 inches long and about ½ inch thick. You can also shape them into flatter, wider strips if you prefer. Aim for them to be somewhat uniform in size so they bake evenly. Place the formed breadsticks onto your prepared baking sheet, leaving a little space between each one.
Step 4: Baking to Golden Perfection
Preheat your oven to 400°F (200°C). Once your oven is fully preheated and your breadsticks are shaped and on the baking sheet, it’s time to bake! Place the baking sheet in the center of the preheated oven. Bake for approximately 20-25 minutes. You’ll want to keep a close eye on them, especially during the last few minutes. They are ready when they are golden brown on the edges and the cheese is melted and bubbly. The tops should feel slightly firm to the touch. If they seem to be browning too quickly on top, you can loosely tent them with aluminum foil. The goal is a beautiful, savory crust and a tender, cheesy interior. The aroma filling your kitchen will be incredible!
Step 5: Cooling and Serving
Once baked to perfection, carefully remove the baking sheet from the oven. Let the Cheesy Zucchini Breadsticks cool on the baking sheet for about 5-10 minutes. This resting period is important as it allows them to firm up slightly, making them easier to handle and preventing them from falling apart. After they’ve had a chance to cool a bit, you can transfer them to a wire rack to cool completely, or serve them warm. These are absolutely divine served warm, with that melted mozzarella still being wonderfully gooey. They are fantastic on their own, or you can serve them with your favorite marinara sauce for dipping. Enjoy these delicious, flavorful, and surprisingly virtuous breadsticks!

Conclusion:
So there you have it – your guide to making absolutely delicious Cheesy Zucchini Breadsticks! I truly hope you’ll give this recipe a try. These breadsticks are fantastic because they’re a brilliant way to use up excess zucchini, turning it into a crowd-pleasing appetizer or snack that’s surprisingly healthy thanks to the hidden veggies. The combination of tender zucchini, gooey cheese, and a hint of garlic is simply irresistible. They’re perfect for potlucks, game nights, or even just a simple family dinner side dish. Feel free to get creative with your favorite herbs or cheeses to make them your own!
I encourage you to experiment with different cheeses like sharp cheddar or a sprinkle of Parmesan for an extra flavor kick. You could even add a pinch of red pepper flakes for a touch of heat! Serve these warm with your favorite marinara sauce for dipping, or alongside a fresh salad. They are incredibly versatile and always a hit.
Frequently Asked Questions:
Can I make these ahead of time?
Yes, you absolutely can! You can prepare the batter and store it in an airtight container in the refrigerator for up to 24 hours before baking. For baked breadsticks, let them cool completely, then store them in an airtight container at room temperature for a day or two, or freeze them for longer storage. Reheat gently in the oven or toaster oven for best results.
What if I don’t have fresh zucchini?
While fresh zucchini is ideal for texture and moisture, you can use frozen zucchini in a pinch. Make sure to thaw it completely and squeeze out as much excess liquid as possible before adding it to the batter to prevent soggy breadsticks.
Can I make these dairy-free?
You can adapt this recipe for a dairy-free version by using your favorite dairy-free shredded cheese and substituting the butter with a plant-based alternative. The texture might be slightly different, but they should still be delicious!
Cheesy Zucchini Breadsticks
Delicious and savory breadsticks made with grated zucchini, mozzarella, and Parmesan cheese, seasoned with Italian herbs and garlic.
Ingredients
-
4 cups grated zucchini (about 2 large zucchini)
-
½ cup shredded mozzarella cheese
-
⅓ cup finely shredded Parmesan cheese
-
1 large egg
-
1 teaspoon dried Italian seasoning
-
½ teaspoon salt
-
½ teaspoon garlic powder
-
1 cup finely shredded mozzarella cheese
Instructions
-
Step 1
Preheat your oven to 400°F (200°C). Line a baking sheet with parchment paper. -
Step 2
In a medium bowl, combine the grated zucchini, ½ cup shredded mozzarella cheese, ⅓ cup finely shredded Parmesan cheese, 1 large egg, 1 teaspoon dried Italian seasoning, ½ teaspoon salt, and ½ teaspoon garlic powder. Mix well until all ingredients are incorporated. -
Step 3
Spread the zucchini mixture evenly onto the prepared baking sheet, forming a rectangular shape about ¼ to ½ inch thick. This will be the base for your breadsticks. -
Step 4
Sprinkle the remaining 1 cup of finely shredded mozzarella cheese evenly over the top of the zucchini mixture. -
Step 5
Bake for 20-25 minutes, or until the edges are golden brown and the cheese is melted and bubbly. -
Step 6
Remove from the oven and let cool slightly. Cut into breadstick shapes before serving warm.
Important Information
Nutrition Facts (Per Serving)
It is important to consider this information as approximate and not to use it as definitive health advice.
Allergy Information
Please check ingredients for potential allergens and consult a health professional if in doubt.