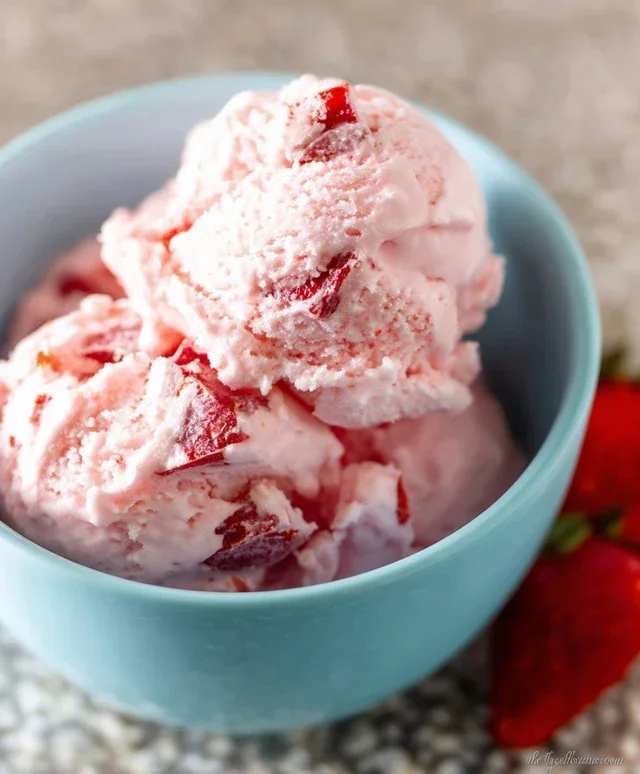
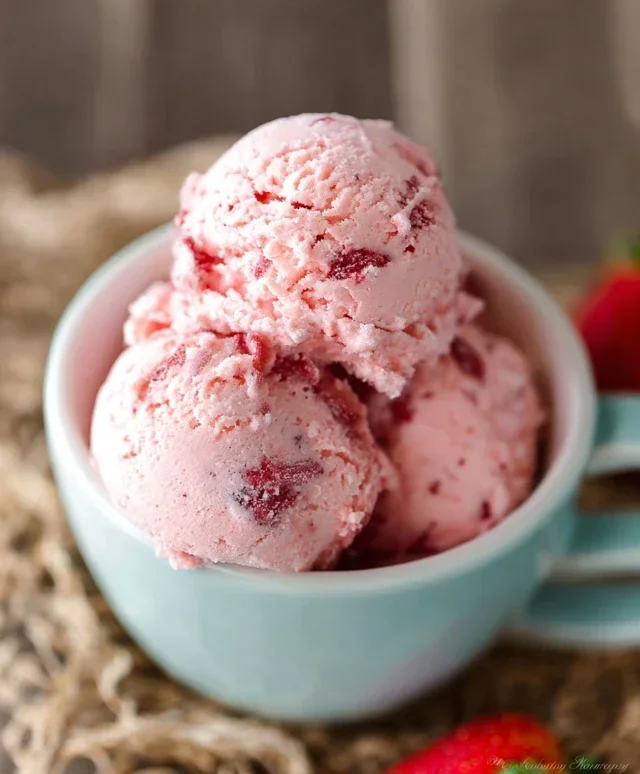
Easy Homemade Strawberry Ice Cream Recipe
Homemade Strawberry Ice Cream is more than just a dessert; it’s a gateway to pure, unadulterated summer bliss. Imagin extracte sinking your spoon into a creamy, dreamy confection bursting with the vibrant, sun-ripened sweetness of fresh strawberries. There’s a reason this classic treat holds such a special place in our hearts. It evokes childhood memories of sticky fingers and sun-drenched afternoons, a feeling of simple, unpretentious joy. What makes our Homemade Strawberry Ice Cream truly stand out? It’s the commitment to using the freshest ingredients, allowing the natural fruit flavor to shine without any artificial interference. We’ll guide you through creating a velvety smooth texture that rivals any store-bought pint, but with an unparalleled depth of flavor that only comes from a labor of love. Get ready to experience the ultimate creamy delight – your very own perfect scoop of Homemade Strawberry Ice Cream.
Homemade Strawberry Ice Cream
There’s something incredibly satisfying about creating your own ice cream from scratch. And when it comes to classic, crowd-pleasing flavors, homemade strawberry ice cream is tough to beat. Forget those artificial-tasting store-bought versions; this recipe captures the vibrant, sweet-tart essence of fresh strawberries in every creamy spoonful. It’s a surprisingly simple process that rewards you with a dessert far superior to anything you can find in a grocery store freezer aisle. The key is using good quality, ripe strawberries – the riper, the sweeter and more intensely flavored your ice cream will be. I love making this on a warm afternoon and enjoying it as the sun sets. It’s a perfect treat for any occasion, from a casual family dessert to a special gathering.
Let’s get started on creating this delightful frozen treat!
Ingredients:
Preparing the Strawberry Base
The first step in crafting our delicious strawberry ice cream is to create a vibrant and flavorful strawberry puree. This is where the magic of fresh fruit really shines. We’ll start by combining our prepared strawberries with a touch of sweetness and a hint of brightness.
1. Mash and Macerate the Strawberries: In a medium bowl, combine the hulled and diced strawberries with the 2 tablespoons of honey, 1/2 cup of granulated sugar, and 1 teaspoon of lemon juice. The honey adds a lovely floral note and helps to draw out the natural juices from the strawberries, while the sugar provides additional sweetness and texture. The lemon juice is crucial here; it doesn’t make the ice cream taste lemony, but rather it brightens the strawberry flavor, preventing it from tasting flat or overly sweet. Gently mash the strawberries with a fork or a potato masher. You want to break them down, but it’s okay to leave some small chunks for delightful textural surprises in the finished ice cream. Once mashed, cover the bowl and let the mixture sit at room temperature for at least 30 minutes. This process, called maceration, allows the sugar to work its magic, drawing out more liquid and intensifying the strawberry flavor. You’ll notice a beautiful, ruby-red syrup forming at the bottom of the bowl. This is pure strawberry essence, and we want to incorporate all of it into our ice cream.
Creating the Creamy Ice Cream Mixture
Now that our strawberries have had time to release their delicious juices, we’ll blend them into a smooth puree and then combine them with our dairy base to create the foundation for our ice cream.
2. Puree the Strawberries: After macerating, transfer the strawberry mixture to a blender or food processor. Blend until smooth. If you prefer a smoother ice cream without any small pieces of strawberry, you can strain the puree through a fine-mesh sieve to remove the seeds. However, I personally enjoy the slight texture the seeds can provide, so I usually skip this step. Once pureed, set the strawberry mixture aside.
3. Combine Dairy and Flavorings: In a separate large bowl, whisk together the 1 cup of heavy whipping cream, 1/2 cup of half and half, and 1 teaspoon of vanilla extract. The heavy cream provides richness and contributes to the luxurious, creamy texture of the ice cream, while the half and half helps to balance the fat content and makes the ice cream slightly lighter. The vanilla extract enhances the overall flavor profile and complements the sweetness of the strawberries beautifully. Whisk until just combined; you don’t want to over-whisk and start making whipped cream at this stage.
4. Incorporate the Strawberry Puree: Pour the strawberry puree into the bowl with the cream mixture. Gently whisk until everything is well combined and the mixture has a beautiful, uniform pink color. Taste the mixture at this point. This is your last chance to adjust the sweetness. If you find it’s not sweet enough for your liking, you can add a tablespoon or two of sugar, whisking until dissolved. Remember that freezing ice cream tends to dull sweetness, so it’s often best to err on the side of slightly sweeter.
Churning and Freezing Your Ice Cream
This is the exciting part where your liquid mixture transforms into delicious ice cream! The churning process incorporates air and freezes the mixture evenly, preventing large ice crystals from forming.
5. Churn the Ice Cream: Pour the strawberry ice cream base into your ice cream maker and churn according to the manufacturer’s instructions. This typically takes about 20-30 minutes. The exact time will depend on your specific machine. You’ll know it’s ready when the mixture has thickened to a soft-serve consistency. It will still be quite soft at this stage, and that’s exactly what we want.
6. Harden the Ice Cream: Once churned to a soft-serve consistency, transfer the ice cream to an airtight container. Press a piece of parchment paper or plastic wrap directly onto the surface of the ice cream to prevent ice crystals from forming. Seal the container tightly and place it in the freezer for at least 4-6 hours, or until it’s firm enough to scoop. For the best texture and flavor, I usually let it freeze overnight. When you’re ready to serve, let the ice cream sit at room temperature for a few minutes to soften slightly, making it easier to scoop. Enjoy your truly homemade, incredibly delicious strawberry ice cream!
Conclusion:
Making your own homemade strawberry ice cream is an incredibly rewarding experience, and this recipe makes it wonderfully achievable. You’ll be amazed at the fresh, vibrant flavor you can achieve compared to store-bought versions. The simplicity of the ingredients allows the natural sweetness and tang of the strawberries to truly shine through, creating a delightful treat perfect for any occasion. We hope you’ll feel inspired to give this fantastic recipe a try!
This creamy, dreamy dessert is wonderful served on its own, but it also pairs beautifully with a variety of toppings. Consider fresh fruit, a drizzle of chocolate sauce, a sprinkle of toasted nuts, or even a dollop of whipped cream. Don’t be afraid to get creative with variations! You can add a touch of lemon zest for extra brightness, swirl in some fresh basil for an unexpected herbaceous note, or even mix in some chocolate chips for a strawberry-chocolate sensation. The possibilities are endless!
Frequently Asked Questions:
Can I make this recipe without an ice cream maker?
Absolutely! While an ice cream maker provides the smoothest texture, you can still achieve delicious results without one. After chilling the base and mixing in the strawberries, pour it into a freezer-safe container. Every 30-45 minutes for the first 3-4 hours, remove it from the freezer and vigorously whisk the mixture to break up ice crystals. This will result in a slightly icier, but still very tasty, frozen dessert.
How long will homemade strawberry ice cream last?
For the best texture and flavor, it’s recommended to consume your homemade strawberry ice cream within 1-2 weeks. Store it in an airtight container in the coldest part of your freezer. Over time, ice crystals can form, affecting the creaminess.
My ice cream isn’t as sweet as I like. Can I adjust the sweetness?
Definitely! The sweetness of strawberries can vary. Before freezing the base, taste it and add more sugar, a tablespoon at a time, until it reaches your desired level of sweetness. Remember that flavors tend to mute slightly when frozen, so it’s good to aim for a slightly sweeter base than you might think necessary.
Homemade Strawberry Ice Cream
A simple and delicious homemade strawberry ice cream recipe using fresh ingredients. This no-churn recipe is perfect for a sweet treat on a hot day.
Ingredients
-
1 1/2 cups strawberries, hulled and diced
-
2 Tbsp honey
-
1/2 cup granulated sugar
-
1 tsp lemon juice
-
1 cup heavy whipping cream
-
1/2 cup half and half
-
1 tsp vanilla extract
Instructions
-
Step 1
In a bowl, combine the diced strawberries, honey, granulated sugar, and lemon juice. Let this mixture sit for about 15-20 minutes, stirring occasionally, allowing the strawberries to macerate and release their juices. -
Step 2
While the strawberries are macerating, in a separate chilled bowl, whip the heavy whipping cream until stiff peaks form. -
Step 3
Gently fold the half and half and vanilla extract into the whipped cream. Be careful not to overmix. -
Step 4
Add the macerated strawberry mixture to the whipped cream mixture. Gently swirl the strawberries into the cream to create streaks, but avoid fully mixing them in for a marbled effect. -
Step 5
Pour the mixture into a freezer-safe container. Cover tightly. -
Step 6
Freeze for at least 6 hours, or until firm. For best results, stir the ice cream every couple of hours during the freezing process.
Important Information
Nutrition Facts (Per Serving)
It is important to consider this information as approximate and not to use it as definitive health advice.
Allergy Information
Please check ingredients for potential allergens and consult a health professional if in doubt.