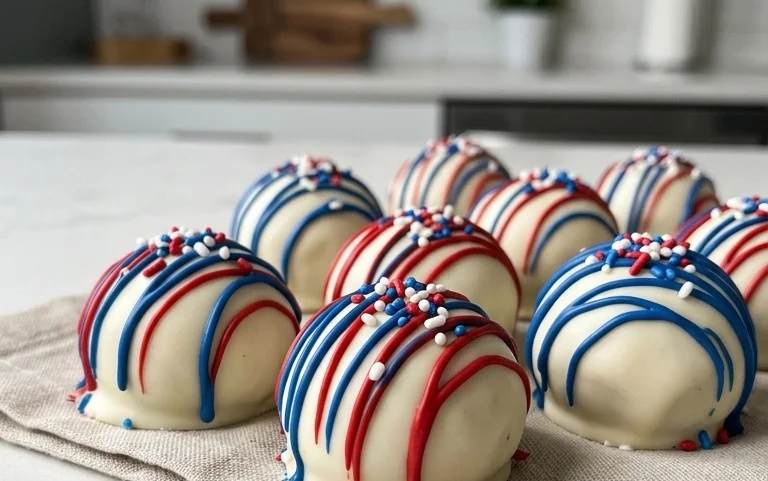
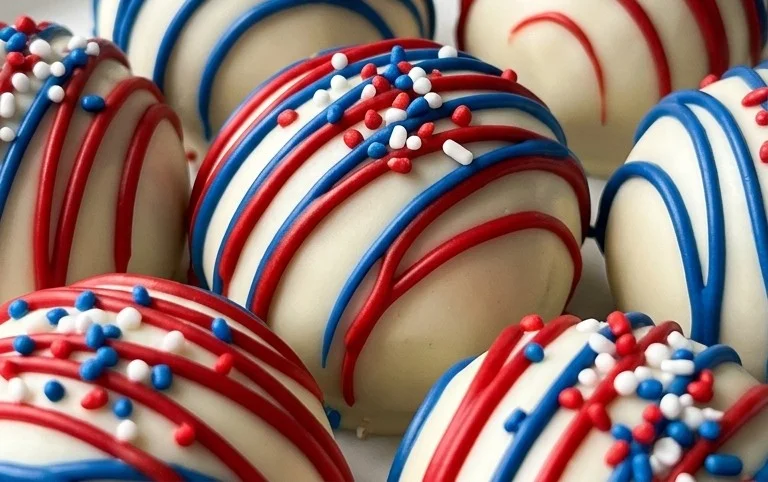
Patriotic Oreo Balls – Easy Festive Treat
Patriotic Oreo Balls are the perfect way to add a pop of red, white, and blue to any celebration, from Fourth of July picnics to Memorial Day gatherings and even casual summer get-togethers. We all know how much everyone adores Oreo balls – that irresistible combination of crushed Oreos, cream cheese, and a smooth chocolate coating is a guaranteed crowd-pleaser. But these aren’t just any Oreo balls; these Patriotic Oreo Balls are dressed up in festive colors, transforming a beloved treat into a visual masterpiece that tastes as good as it looks. What makes them so special? It’s the simple yet stunning visual appeal, coupled with the same delightful flavor profile we’ve come to know and love. They’re incredibly easy to make, making them a fantastic activity for kids and a stress-free addition to your party planning. Get ready to impress your guests with these vibrant and delicious Patriotic Oreo Balls!
Patriotic Oreo Balls
Get ready to celebrate with a truly delightful and festive treat! These Patriotic Oreo Balls are incredibly easy to make and are sure to be a showstopper at any Fourth of July picnic, Memorial Day gathering, or any occasion where you want to add a splash of red, white, and blue to your dessert table. They’re surprisingly simple, requiring no baking at all, making them a perfect activity for all ages. The rich, chocolatey flavor of Oreos combined with the creamy filling and the crisp candy coating creates a perfect balance of textures and tastes. Let’s dive into making these irresistible patriotic delights!
Ingredients:
Creating the Oreo Ball Mixture
The foundation of our delicious Patriotic Oreo Balls is a simple yet magical combination of crushed Oreos and cream cheese. This no-bake base is what gives these treats their irresistible texture and flavor.
Step 1: Prepare the Oreo Crum extractbs
First, we need to turn those whole Oreo cookies into fine crum extractbs. You can achieve this in a few ways. The easiest and quickest method is to use a food processor. Simply toss the entire family-size package of Oreo cookies (yes, cream filling and all!) into your food processor and pulse until you have a fine, sandy crum extractb. If you don’t have a food processor, don’t worry! You can also place the Oreos in a large zip-top bag, seal it tightly, and then use a rolling pin to crush them into fine crum extractbs. Be thorough; you want to ensure there are no large chunks remaining, as this will affect the consistency of your Oreo balls.
Step 2: Combine with Cream Cheese
Once you have your beautifully crushed Oreo crum extractbs, it’s time to introduce the cream cheese. Make sure your cream cheese has been softened to room temperature. This is a crucial step because cold cream cheese will be difficult to incorporate evenly, potentially leaving you with lumps. In a large mixing bowl, add the softened cream cheese and the Oreo crum extractbs. Now, using your hands (clean, of course!) or a sturdy spatula, mix and knead the ingredients together until they are thoroughly combined and form a cohesive dough-like mixture. It might feel a bit sticky, but that’s perfectly normal. The goal is to have a uniform color and texture throughout.
Step 3: Form the Oreo Balls
Now comes the fun part: rolling! Take small portions of the Oreo mixture, about 1 tablespoon each, and roll them between your palms to form uniform balls. Aim for consistency in size so that they all bake (or rather, set) evenly. As you roll each ball, gently press them to ensure they are firm and won’t fall apart. Place the rolled Oreo balls onto a baking sheet lined with parchment paper. This prevents sticking and makes it easy to transfer them later. You should aim to make roughly 40-50 balls, depending on how large you make them. Don’t worry if they aren’t perfectly round; a slightly rustic look is charming!
Melting and Coating Your Patriotic Masterpieces
This is where the red, white, and blue truly come to life! Melting the candy melts and coating your Oreo balls is a simple process that yields stunning results.
Step 4: Melt and Coat with Red and Blue Candy Melts
We’ll be creating a striped or marbled effect for that patriotic look. Divide the candy melts into two separate microwave-safe bowls – one for the red and one for the blue. Following the package instructions, melt each color of candy melts. Typically, this involves microwaving in short bursts (30-second intervals), stirring in between, until the melts are smooth and completely liquid. Be careful not to overheat them, as this can cause them to seize. Once melted, dip about half of your rolled Oreo balls into the red candy melts, ensuring they are fully coated. You can use a fork or a toothpick to help you dip and lift them. Place the coated balls back onto the parchment-lined baking sheet. Repeat this process with the blue candy melts for the remaining Oreo balls. For a truly festive look, you can try swirling the red and blue melts together in one bowl for a marbled effect before dipping, or you can dip half in red and half in blue, and then drizzle the opposite color over the top.
Step 5: Add the White Chocolate Drizzle and Stars
Now for the finishing touch that brings the “white” into our patriotic theme! Place the Ghirardelli white melting wafers in a small microwave-safe bowl and melt them according to package directions, similar to the candy melts. Once smooth and melted, use a spoon or a piping bag with a small tip to drizzle the white chocolate over the red and blue coated Oreo balls. As soon as you finish drizzling the white chocolate, while it’s still wet, sprinkle the white star confetti sprinkles generously over the tops. The white chocolate acts as a “glue” for the sprinkles, ensuring they adhere beautifully. Work quickly to get the sprinkles on before the white chocolate sets. Allow the Oreo balls to set completely at room temperature or in the refrigerator for about 15-20 minutes until the candy coating is firm.
These Patriotic Oreo Balls are best stored in an airtight container at room temperature or in the refrigerator. Enjoy your delicious and festive homemade treats!
Conclusion:
There you have it – a simple yet incredibly rewarding recipe for Patriotic Oreo Balls that’s sure to be a hit at any gathering, especially during those celebratory holidays! The beauty of this treat lies in its effortless preparation and universally loved flavor combination of classic Oreos and creamy goodness. They are the perfect no-bake dessert for when you need a sweet fix without turning on the oven, making them ideal for hot summer days or busy holiday weekends. I just love how customizable they are, allowing you to express your creativity with different colored coatings and sprinkles. Don’t hesitate to give these a try – I promise they’ll disappear faster than you can say “red, white, and blue”!
For serving, these Patriotic Oreo Balls are fantastic on their own, but they also make a charming addition to dessert platters alongside other festive treats. Consider arrangin extractg them artfully on a tiered stand or presenting them in individual cellophane bags tied with ribbon for a delightful party favor. For variations, feel free to experiment with different cookie flavors beyond the classic chocolate Oreo, or perhaps swirl in some white chocolate for an added layer of decadence. You could even add a touch of peppermint extract to the filling for a refreshing twist.
Frequently Asked Questions:
How long do Patriotic Oreo Balls last?
Stored in an airtight container in the refrigerator, these delicious treats can last for up to a week. For longer storage, you can freeze them for up to 2-3 months. Just let them thaw at room temperature for about 15-20 minutes before enjoying.
Can I use different types of cream cheese?
Absolutely! While regular full-fat cream cheese is recommended for the best texture and flavor, you can also use reduced-fat cream cheese. Just be aware that the consistency might be slightly different, and they may need a little more chilling time to firm up.
What are some other coating ideas besides candy melts?
You’re welcome to get creative! Melted white chocolate, dark chocolate, or even milk chocolate can be used as coatings. For a more vibrant, patriotic look, you can also dye white chocolate with food coloring. Just ensure your chocolate is tempered properly for a smooth, shiny finish.
Patriotic Oreo Balls
Deliciously festive no-bake treats perfect for any patriotic celebration. These Oreo balls are dipped in red and blue candy melts and decorated with white stars.
Ingredients
-
1 lb 2.12 oz Family Size package Oreo Cookies
-
8 ounce block cream cheese, softened
-
12 ounce bag red candy melts
-
12 ounce bag blue candy melts
-
⅓ cup Ghirardelli white melting wafers
-
White star confetti sprinkles
Instructions
-
Step 1
Crush the Oreo cookies into fine crumbs using a food processor or by placing them in a sealed bag and crushing with a rolling pin. Ensure no large chunks remain. -
Step 2
In a large bowl, combine the Oreo cookie crumbs and softened cream cheese. Mix thoroughly until well combined and a dough-like consistency forms. -
Step 3
Roll the mixture into small balls, about 1 inch in diameter. Place the balls on a baking sheet lined with parchment paper. -
Step 4
Melt the red and blue candy melts separately according to package directions. Melt the white melting wafers separately. -
Step 5
Dip each Oreo ball into the melted candy melts, coating completely. For a layered look, you can alternate colors or dip half in one color and the other half in another. Place back on the parchment-lined baking sheet. -
Step 6
While the candy coating is still wet, sprinkle the white star confetti sprinkles over the balls. -
Step 7
Allow the candy coating to set completely at room temperature or by refrigerating for a short period.
Important Information
Nutrition Facts (Per Serving)
It is important to consider this information as approximate and not to use it as definitive health advice.
Allergy Information
Please check ingredients for potential allergens and consult a health professional if in doubt.