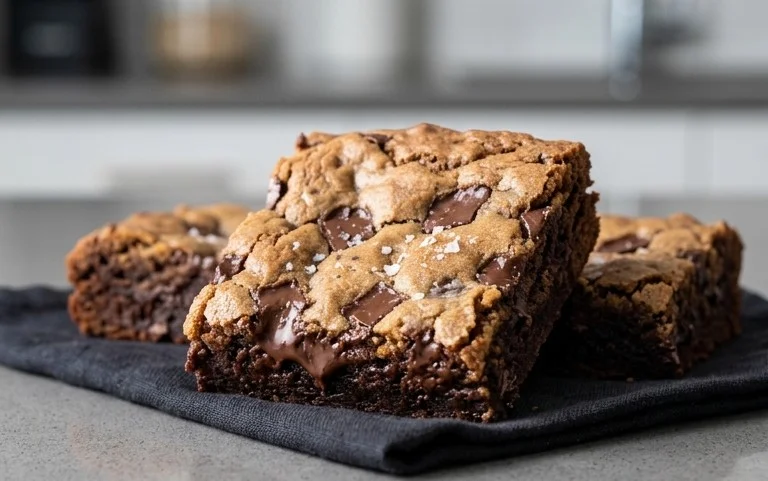
Mini Egg Cheesecake Cookie Bars Delightful Treat
Mini Egg Cheesecake Cookie Bars are the ultimate springtime indulgence, a treat that perfectly bridges the gap between two beloved desserts. If you’re like me, the arrival of those vibrant, pastel-shelled Mini Eggs signals more than just Easter; it means it’s time to bake! These bars are a dream come true for anyone who adores the creamy, tangy bliss of cheesecake and the comforting chegrape juicess of a classic cookie. What truly sets these Mini Egg Cheesecake Cookie Bars apart is the delightful textural contrast. Imagin extracte a rich, buttery cookie base, giving way to a smooth, luscious cheesecake layer studded with those iconic crunchy, chocolate-filled Mini Eggs. Each bite is a symphony of sweet, creamy, and a satisfying little pop of chocolatey goodness. They’re incredibly easy to make, making them a perfect project for family baking or a show-stopping dessert for any spring gathering. Get ready to fall in love with these irresistible Mini Egg Cheesecake Cookie Bars!
Mini Egg Cheesecake Cookie Bars
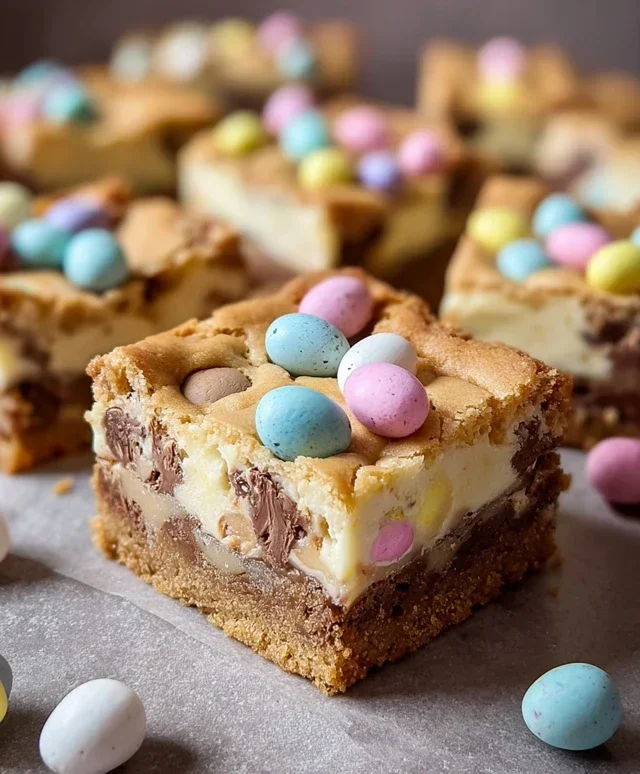
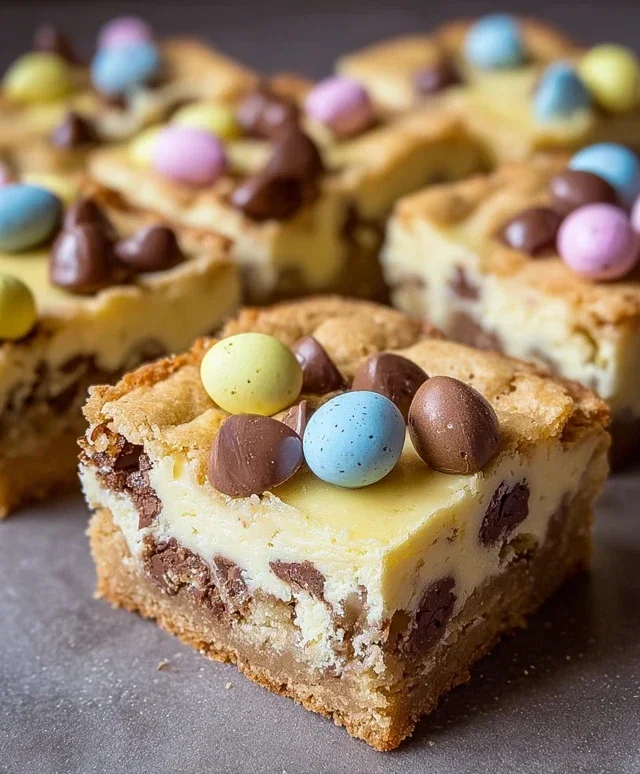
Get ready for a decadent treat that’s sure to impress! These Mini Egg Cheesecake Cookie Bars are the perfect marriage of chewy, buttery cookie dough and rich, creamy cheesecake, all studded with the delightful crunch and chocolatey surprise of Cadbury Mini Eggs. Whether you’re baking for a special occasion, a holiday gathering, or just because you deserve something sweet, these bars are a guaranteed crowd-pleaser. The vibrant colors of the Mini Eggs also make them a fantastic option for Easter or any spring celebration. The process might seem a little involved with two distinct layers, but I promise, it’s straightforward and the end result is absolutely worth every step. Let’s dive into the deliciousness!
Ingredients:
Cheesecake Layer Preparation
Let’s start with the star of the show: the cheesecake layer. It’s important that your cream cheese is truly softened to room temperature. This means it should be easily pressed with your finger without resistance. If you forget to take it out in advance, you can gently warm it in the microwave for about 15-20 second bursts, stirring in between, but be careful not to melt it completely. In a medium bowl, combine the softened cream cheese and ⅓ cup of sugar. Use an electric mixer (handheld or stand mixer with a paddle attachment) to beat them together until the mixture is smooth and creamy, with no lumps of cream cheese remaining. This usually takes a minute or two. Scrape down the sides of the bowl as needed. Next, add 1 large egg and 1 teaspoon of vanilla extract to the cream cheese mixture. Beat again until everything is just combined and smooth. Be careful not to overmix at this stage, as it can lead to a tougher cheesecake. Set this luscious cheesecake mixture aside while we prepare the cookie dough base.
Cookie Dough Base
Now for the glorious cookie dough! In a large bowl, or the bowl of your stand mixer, combine the melted butter with ¾ cup of light brown sugar and ½ cup of granulated sugar. Whisk or beat them together until well combined and smooth. This mixture will be quite liquidy due to the melted butter, which is perfectly normal. Next, beat in 2 large eggs, one at a time, ensuring each egg is fully incorporated before adding the next. Stir in 1 ½ teaspoons of vanilla extract. In a separate medium bowl, whisk together the dry ingredients: 2 ¼ cups of flour, 1 teaspoon of baking soda, ½ teaspoon of baking powder, and ½ teaspoon of salt. It’s important to whisk these together well to ensure the leavening agents and salt are evenly distributed throughout the flour, which will prevent pockets of saltiness or uneven rising in your bars. Gradually add the dry ingredients to the wet ingredients, mixing on low speed or by hand until just combined. Be careful not to overmix the dough at this stage, as overmixing flour can develop the gluten too much, resulting in tough cookies. Finally, gently fold in the chopped Cadbury Mini Eggs and the chocolate chips. This is where the magic starts to happen visually, with those colorful speckles and rich chocolate peeking through.
Assembling and Baking the Bars
Preheat your oven to 350°F (175°C). Line a 9×13 inch baking pan with parchment paper, leaving an overhang on the sides. This will make it super easy to lift the bars out of the pan once they’re cooled. Spread about two-thirds of the cookie dough mixture evenly into the bottom of the prepared baking pan. You can press it down gently with your hands or the back of a spoon to create an even layer. Don’t worry if it’s not perfectly smooth; the texture adds to the charm. Carefully spoon the cheesecake mixture over the cookie dough base, spreading it evenly to cover the entire surface. Don’t worry if some cookie dough peeks through; it will bake into delicious pockets. Dollop the remaining one-third of the cookie dough mixture over the cheesecake layer. You can gently swirl it in with a knife or toothpick, or just leave them as dollops for a more rustic look. If you reserved any whole Mini Eggs, you can press a few into the top for an extra decorative touch.
Baking and Cooling
Bake for 30-40 minutes, or until the edges of the cookie dough are golden brown and the center is set. The cheesecake portion should appear set but might have a slight wobble. A toothpick inserted into the center should come out with moist crum extractbs, but not wet batter. Be aware that the baking time can vary depending on your oven, so keep an eye on them. Once baked, remove the pan from the oven and let the bars cool completely in the pan on a wire rack. This cooling process is crucial! The cheesecake needs time to firm up. Rushing this step will result in bars that fall apart. Once completely cooled (this can take a couple of hours), use the parchment paper overhang to lift the entire slab out of the pan. For cleaner cuts, you can chill the slab in the refrigerator for at least 30 minutes before cutting. This makes them much easier to slice into bars.
Enjoying Your Masterpiece
Once chilled and cut into bars, these Mini Egg Cheesecake Cookie Bars are ready to be devoured! Store any leftovers in an airtight container in the refrigerator for up to 3-4 days. The combination of textures and flavors is truly something special, and I’m sure you’ll love them as much as I do. Happy baking!
Conclusion:
I hope you absolutely adore these Mini Egg Cheesecake Cookie Bars as much as I do! They’re truly the best of both worlds, combining the chewy, satisfying texture of a classic cookie with the rich, creamy decadence of cheesecake, all studded with those delightful little chocolatey bursts of Mini Eggs. These bars are perfect for Easter celebrations, but honestly, they’re delicious enough to make any day feel special. The sweet cookie base, the tangy cheesecake filling, and the vibrant pops of Mini Egg goodness create a flavor and texture experience that’s simply irresistible. They’re surprisingly easy to whip up, making them a fantastic treat for both novice and experienced bakers.
For serving, I love cutting them into generous squares and enjoying them chilled. They’re wonderful on their own with a cup of coffee or tea, but you could also elevate them further with a drizzle of white chocolate or a dollop of whipped cream. If you’re feeling adventurous with variations, consider adding some finely chopped orange zest to the cheesecake layer for a bright citrus note, or swap out the Mini Eggs for other Easter candies like Cadbury Creme Eggs or even just your favorite chocolate chips.
I truly encourage you to give these Mini Egg Cheesecake Cookie Bars a try. They’re a guaranteed crowd-pleaser and a delightful way to bring a little extra joy to your baking adventures.
Frequently Asked Questions:
Can I make these bars ahead of time?
Absolutely! These bars are fantastic for making ahead. You can bake them a day or two in advance and store them, covered, in the refrigerator. They actually taste even better after the flavors have had a chance to meld overnight!
How should I store leftover bars?
Leftover Mini Egg Cheesecake Cookie Bars should be stored in an airtight container in the refrigerator. They’ll keep well for up to 3-4 days.
Can I use regular chocolate chips instead of Mini Eggs?
Yes, you certainly can! If Mini Eggs aren’t available or you prefer something else, regular milk or dark chocolate chips will work wonderfully in this recipe. You could also try chopped Cadbury Creme Eggs or even M&Ms.
Mini Egg Cheesecake Cookie Bars
Decadent cookie bars with a creamy cheesecake layer, studded with Cadbury Mini Eggs and chocolate chips. A perfect treat for any occasion.
Ingredients
-
1 cup butter, melted
-
¾ cup light brown sugar
-
½ cup sugar
-
2 large eggs
-
1 ½ tsp vanilla extract
-
2 ¼ cups flour
-
1 tsp baking soda
-
1 tsp baking powder
-
½ tsp salt
-
1 ½ cups Cadbury mini eggs
-
1 cup chocolate chips
-
1 (8 oz.) block of cream cheese, softened
-
⅓ cup sugar
-
1 large egg
-
1 tsp vanilla extract
Instructions
-
Step 1
Preheat oven to 350°F (175°C). Grease and flour a 9×13 inch baking pan. -
Step 2
In a large bowl, cream together the melted butter, light brown sugar, and ½ cup sugar until well combined. Beat in 2 large eggs one at a time, then stir in 1 ½ tsp vanilla extract. -
Step 3
In a separate bowl, whisk together the flour, baking soda, baking powder, and salt. Gradually add the dry ingredients to the wet ingredients, mixing until just combined. Stir in the Cadbury mini eggs and chocolate chips. -
Step 4
Press half of the cookie dough evenly into the prepared baking pan. -
Step 5
In a medium bowl, beat the softened cream cheese with ⅓ cup sugar and 1 large egg until smooth. Stir in 1 tsp vanilla extract. -
Step 6
Pour the cheesecake mixture evenly over the cookie dough in the pan. Dollop the remaining cookie dough over the cheesecake layer and spread gently to cover. -
Step 7
Bake for 30-35 minutes, or until the edges are golden brown and the center is set. Let cool completely before cutting into bars.
Important Information
Nutrition Facts (Per Serving)
It is important to consider this information as approximate and not to use it as definitive health advice.
Allergy Information
Please check ingredients for potential allergens and consult a health professional if in doubt.