Easy Strawberry Danish Pastry Recipe-Flaky & Delicious
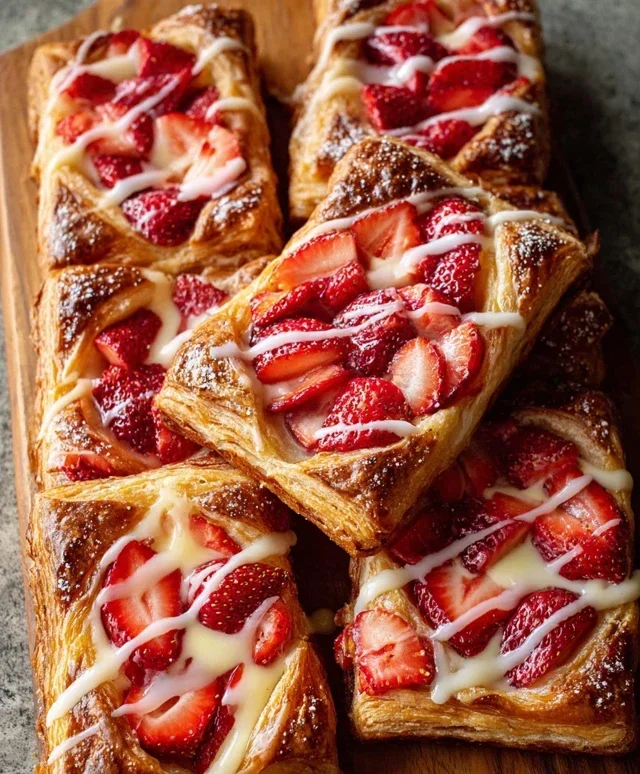
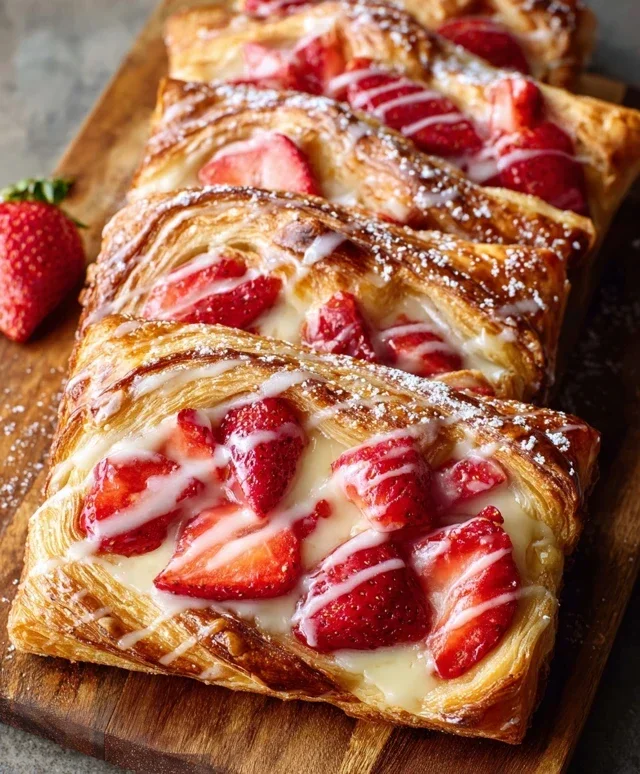
Strawberry Danish recipes are a delightful journey into flaky, buttery pastry and sweet, vibrant fruit. There’s something undeniably special about a homemade Strawberry Danish; it evokes a sense of indulgence and simple pleasure that’s hard to resist. Think of that satisfying crunch as your fork breaks through the golden layers of puff pastry, followed by the burst of warm, slightly tart strawberries nestled in a creamy, sweet cheese filling. It’s this perfect symphony of textures and flavors that makes the Strawberry Danish a universally beloved treat, perfect for a weekend brunch, an afternoon pick-me-up, or even a sophisticated dessert. Forget store-bought imposters; creating your own Strawberry Danish from scratch allows you to control the quality of ingredients and infuse it with your personal touch. Let’s dive into how we can recreate this bakery-worthy delight in our own kitchens!
Strawberry Danish Recipe
There’s something undeniably delightful about a Strawberry Danish. The flaky, buttery pastry, the sweet, slightly tart strawberry filling, and the creamy, luscious center – it’s a trifecta of deliciousness that’s perfect for breakfast, brunch, or a special afternoon treat. While store-bought versions are convenient, making them from scratch allows you to control the quality of ingredients and the sweetness, and the aroma that fills your kitchen is simply unparalleled. Today, we’re diving into how to create these beautiful and utterly irresistible pastries right in your own home. Get ready to impress yourself and anyone lucky enough to share them with you!
Ingredients:
Preparing the Strawberry Filling
Our journey begin extracts with creating the star of the show: the strawberry filling. We want a filling that’s sweet and jammy, but not overly watery, so it holds its shape beautifully within the pastry.
1. In a medium saucepan, combine the 4 cups of sliced strawberries with 1 tablespoon of cornstarch and 1 tablespoon of sugar. The cornstarch is our secret weapon for thickening the filling, ensuring it’s not too runny once baked. Stir gently to coat the strawberries evenly. Place the saucepan over medium heat.
2. Cook the strawberry mixture, stirring occasionally, until the strawberries begin extract to break down and release their juices, and the mixture starts to thicken. This usually takes about 5-7 minutes. You’ll notice the liquid becoming more syrupy and translucent. Once thickened, remove the saucepan from the heat and set it aside to cool completely. Allowing it to cool is crucial; we don’t want a hot filling melting our cream cheese mixture or making the puff pastry soggy.
Crafting the Cream Cheese Filling
While our strawberry filling cools, we’ll prepare the decadent cream cheese layer that adds a wonderful richness and smooth texture to our Danishes.
3. In a medium bowl, combine the 8 oz. of room-temperature cream cheese with ½ cup of powdered sugar and 1 teaspoon of vanilla extract. Using room-temperature cream cheese is key here; it makes it so much easier to mix and achieve a perfectly smooth and lump-free filling. Using an electric mixer (handheld or stand mixer) on medium speed, beat the ingredients together until light, fluffy, and well combined. Scrape down the sides of the bowl as needed to ensure everything is incorporated. This should take about 2-3 minutes.
Assembling the Danishes
Now for the exciting part – bringin extractg all our delicious components together! Working with puff pastry can seem intimidating, but with a few simple techniques, you’ll be a pro in no time.
4. Gently unfold your thawed puff pastry sheets onto a lightly floured surface. If your pastry sheets are large, you might want to trim them into more manageable squares or rectangles. Using a sharp knife or pizza cutter, cut each puff pastry sheet into roughly 4 equal squares. This will give you 8 squares in total. Don’t worry if they aren’t perfectly uniform; rustic charm is part of the appeal!
5. For each pastry square, we’re going to create a “well” for our fillings. Using your knife, lightly score a border about ½ inch (1.25 cm) in from the edges of each square, being careful not to cut all the way through. This border will puff up beautifully when baked, creating a lovely frame. Then, using a fork, gently prick the area inside the scored border a few times. This prevents that center section from puffing up too much and allows the fillings to nestle in nicely.
Filling and Baking Your Strawberry Danishes
The final steps involve adding our delicious fillings and baking these beauties to golden-brown perfection.
6. To each pastry square, spoon about 1-2 tablespoons of the cream cheese mixture into the center, within the scored border. Then, top the cream cheese with a generous spoonful of the cooled strawberry filling. You want to fill them, but avoid overfilling, which can lead to leakage.
7. Brush the scored borders of each Danish with the lightly beaten egg wash (the large egg beaten with 1 teaspoon of water). This egg wash is what will give your Danishes that beautiful golden-brown sheen as they bake. If you like an extra touch of sweetness and texture, you can sprinkle the egg-washed borders with 2-3 tablespoons of granulated sugar. This adds a delightful crunch and sparkle.
8. Carefully transfer the filled Danishes to a baking sheet lined with parchment paper. I like to space them out a bit on the baking sheet to allow for even air circulation and prevent them from sticking together. Bake in a preheated oven at 400°F (200°C) for 18-22 minutes, or until the puff pastry is golden brown, puffed up, and beautifully flaky. Keep a close eye on them in the last few minutes to prevent burning.
Finishing Touches: The Glaze
No Danish is complete without a delightful glaze! This simple glaze adds a touch of sweetness and a beautiful finish.
9. While the Danishes are baking, prepare the glaze. In a small bowl, whisk together 1 cup of powdered sugar, ½ teaspoon of vanilla extract, and 2-3 tablespoons of milk until smooth and pourable. You want a consistency that’s thick enough to drizzle but not so thick that it’s difficult to work with. Add the milk a tablespoon at a time until you reach your desired consistency. If you want a slightly more gourmet touch, you can gently warm ¼ cup of strawberry jam and drizzle that over the Danishes before the powdered sugar glaze.
10. Once the Danishes are out of the oven and have cooled slightly (just enough to handle), drizzle the prepared glaze generously over the top. If you used the optional strawberry jam, you can drizzle that on top of the jam and then the powdered sugar glaze. Allow the glaze to set for a few minutes before serving.
These homemade Strawberry Danishes are best enjoyed warm, but they are also delicious at room temperature. Store any leftovers in an airtight container at room temperature for up to 2 days. Enjoy this taste of pastry paradise!
Conclusion:
I hope you’re as excited as I am to try this delicious Strawberry Danish recipe! This recipe is a fantastic way to bring a touch of bakery elegance right into your own kitchen. The flaky, buttery puff pastry perfectly complements the sweet, slightly tart strawberry filling, creating a truly delightful treat. It’s impressive enough for guests but simple enough for a weekend indulgence. I find these danishes are wonderful served warm, perhaps with a dusting of powdered sugar or a dollop of fresh whipped cream. For a more decadent experience, consider adding a drizzle of cream cheese glaze or even a sprinkle of chopped almonds before baking.
Don’t be afraid to experiment! You can swap out the strawberries for other berries like raspberries or blueberries, or even try a mix. A touch of lemon zest in the filling really brightens the flavor too. The beauty of this Strawberry Danish recipe is its versatility. I truly encourage you to give it a go. The aroma alone will fill your home with happiness, and the taste will have you coming back for more. Happy baking!
Frequently Asked Questions:
Can I use frozen strawberries?
Absolutely! If using frozen strawberries, thaw them completely and drain off any excess liquid before mixing them with the sugar and cornstarch. This helps prevent a watery filling.
How long do these danishes keep?
Strawberry Danishes are best enjoyed fresh, ideally within a day or two. Store any leftovers in an airtight container at room temperature. If they lose some crispness, you can briefly reheat them in a low oven to refresh them.
Strawberry Danish Recipe
A delightful recipe for homemade Strawberry Danish, featuring a creamy cream cheese filling and fresh strawberries, all wrapped in flaky puff pastry.
Ingredients
-
4 cups sliced strawberries
-
1 tablespoon cornstarch
-
1 tablespoon sugar
-
8 oz. (226 g) cream cheese, room temperature
-
½ cup (60 g) powdered sugar
-
1 teaspoon vanilla extract
-
2 puff pastry sheets, thawed
-
1 large egg ( lightly beaten with 1 teaspoon water)
-
2 – 3 tablespoons sugar for topping, optional
-
¼ cup (60 ml) strawberry jam, optional for topping
-
1 cup (120 g) powdered sugar
-
½ teaspoon vanilla extract
-
2 – 3 tablespoons (30 – 45 ml) milk
Instructions
-
Step 1
Preheat oven to 400°F (200°C). Line a baking sheet with parchment paper. -
Step 2
In a medium bowl, combine sliced strawberries, cornstarch, and 1 tablespoon sugar. Toss to coat. Set aside. -
Step 3
In another bowl, beat cream cheese until smooth. Gradually add ½ cup powdered sugar and 1 teaspoon vanilla extract, beating until well combined. -
Step 4
Unfold puff pastry sheets and cut each into 4 equal rectangles. Place on the prepared baking sheet. Score a border about 1 inch from the edge of each pastry rectangle. -
Step 5
Spoon the cream cheese mixture evenly into the center of each pastry rectangle, staying within the scored border. Top with the prepared strawberry mixture. -
Step 6
Brush the edges of the pastry with the egg wash. If using, sprinkle the edges with 2-3 tablespoons of sugar. -
Step 7
Bake for 18-20 minutes, or until the pastry is puffed and golden brown. -
Step 8
While the danishes are baking, prepare the glaze: whisk together 1 cup powdered sugar, ½ teaspoon vanilla extract, and milk until smooth and drizzly. Add more milk if needed to reach desired consistency. -
Step 9
Remove danishes from the oven and let cool slightly on the baking sheet. Drizzle with the glaze and optionally top with strawberry jam.
Important Information
Nutrition Facts (Per Serving)
It is important to consider this information as approximate and not to use it as definitive health advice.
Allergy Information
Please check ingredients for potential allergens and consult a health professional if in doubt.